In this post, you can see a tiny, yet quite useful, microcontroller-based USB key/Foot Pedal for Windows™ computers as a little do-it-yourself project. It is particularly geared as single function key, but other usages are also possible. This funny article is aimed at novices. As a flexible USB HID (USB human interface device) project, it can be weighed simple to medium on a scale from very simple to very difficult. Note that, HID (Human Interface Device) is one of the many defined USB device classes. Every USB device is assigned a device class, which defines what exactly its general purpose is. There are lots of classes –printers, hubs, and speakers to mention a few.
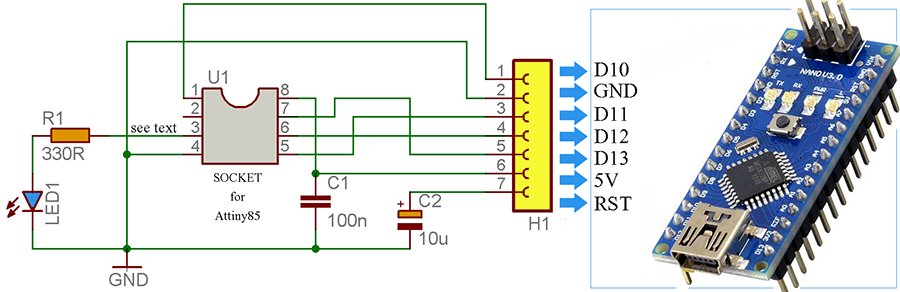
I chose the name “Tiny USB Windows® Key” for this USB button/Foot pedal. The controller part is a Digispark Attiny85 development board. Surprisingly, the stamp-sized board offers a standard USB interface and good compatibility with the revered Arduino IDE. The concept is based on a dedicated library for Digispark to emulate a USB keyboard. When the user activates the device, it sends out a predefined keystroke (hide/show desktop) to the connected computer to control the desktop instantly. Well, get ready to set it right!
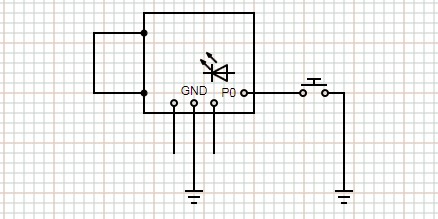
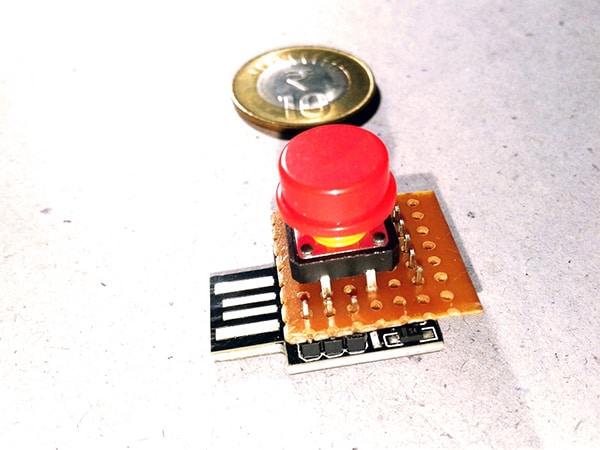
As can see from the above hardware prep diagram, the entire assembly is extremely simple. Just connect a normally-open momentary button switch between P0 and GND of Digispark board. That’s all. I used a Chinese clone Digispark board (Rev 3), and an Omron B3F-4055 tactile switch with red round cap as key the components in my quick test setup.
The code, in the form of Arduino Sketch, given below uses the “DigiKeyboard” library to emulate the USB keyboard. The code provided below can be compiled and uploaded using the Arduino IDE. The code simulates the keypress in a sequence of two keys at the same time and after a short delay, it releases them (that means only one keyboard shortcut after the key button has been pushed). You may checkout this GitHub link to get further details about the DigiKeyboard library https://github.com/digistump/DigistumpArduino/blob/master/digistump-avr/libraries/DigisparkKeyboard/DigiKeyboard.h
/*
 * Tiny USB Windows Key/ USB Foot Pedal
 * Another Simple USB HID Pedal Project
 * Hardware: Digispark Attiny85
 * Tested OS: Microsoft Windows 7 Ultimate
 * Author: T.K.Hareendran/06-2020
 * Publisher: Codrey Electronics
 */

#include "DigiKeyboard.h"  //Keyboard Library
#define KEY_MODIFIER_LEFT_GUI 0x08  // Windows Logo Key
#define KEY_D 7  // D Key
bool state = false;
int countdown = -1;

void setup() {
  pinMode(0, INPUT); // P0 as Button Input
  pinMode(1,OUTPUT); // P1 as Output
  digitalWrite(0, HIGH); // Enable Internal Pull-up
  delay(6000); // Initial Delay
  digitalWrite(1,HIGH); // Turn onboard LED (P1) on
}

void loop() {
  DigiKeyboard.sendKeyStroke(0);
 int sensorValue = digitalRead(0);
  if (sensorValue == 0) {
 if (countdown == 0) {
     if (state == false) {
 DigiKeyboard.sendKeyStroke(KEY_D, MOD_GUI_LEFT); // Hide/Show Desktop
        state = true;
}
    } else if (countdown == -1) {
      countdown = 10;  // key delay counter
      state = false;
    } else {
      countdown--;
    }
  } else {
    countdown = -1;
  }
  DigiKeyboard.delay(100);
}
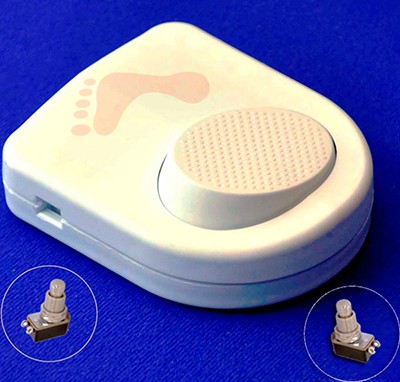
The construction should be a piece of butter bread even for novices. It is possible to use the ‘Digispark Button Shield’ for this project. Incase it’s not within easy reach, or you don’t want to buy one, just use a small piece of shipboard as an alternative (called for some dexterity though). This is the photograph of my quick test setup.
Plug the ready-to-use device to any vacant USB port of a Windows computer, and wait until the onboard red indicator (P1 LED) comes up. Thereafter you can push the key button to you’re your desktop. And, the desktop can be recalled through the next push of the same key button. Once everything is setup and working, you can even take it a step further by using a USB foot pedal in lieu of the small button switch. Simply make one USB foot pedal yourself at home with a cute 3D-printed enclosure and a 2-pin soft-touch momentary footswitch (look below). You probably won’t want such an external USB pedal, but if you occasionally need a ‘secret’ pedal for something odd, roll up your sleeves, and go on!
Note that at power up, Digispark’s onboard red power indicator (power LED) of the Digispark board lights up quickly, and after a few seconds another onboard red indicator (user LED) wakes up to notify that it’s ready for use. The connected Windows PC identified the key/pedal device as a USB HID Keyboard!

Human Interface Device (HID) class is one of the most frequently used USB classes. The HID class consists primarily of devices that are used by humans to control the operation of computer systems. Examples of HID class devices include keyboards, pointing devices, control devices, the devices that humans use to enter data directly into a computer, and other devices that may not require direct human interaction but provide data in a similar to HID class devices format.
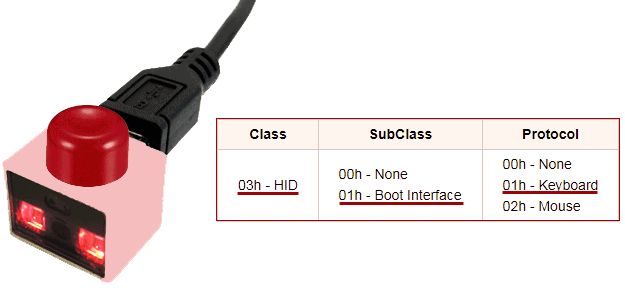
USB defines class code information that is used to identify the functionality of a device and to nominally load a device driver based on that functionality. The information is contained in three bytes with the names Base Class (USB Class), SubClass, and Protocol. The Base Class 03h as seen here is defined for devices that conform to the HID (Human Interface Device) Device Class Specification found on the USB-IF website. The specification defines the usable set of SubClass and Protocol values. Values outside of that defined spec are reserved, and these class codes can only be used in Interface Descriptors. Further reading https://www.usb.org/defined-class-codes
On a side note, “USBlyzer” is a pretty great professional USB sniffer software for monitoring and analyzing the USB devices traffic. The program can be successfully employed for USB protocol analysis, debugging and reverse-engineering and USB-related application, device driver or hardware development. It is a very useful tool for anyone who needs a visual picture of the traffic passing through USB subsystem. This is a fully functional trial version pack of USBlyzer. You can evaluate this fully functional trial version free of charge for a limited period of 33 days http://www.usblyzer.com/files/USBlyzer.zip
Back to the basic design scheme, it is essentially, a USB keyboard with only one key. Plug it into any computer that can understand a basic USB HID – which means just about every Windows desktop or laptop computer will detect a new keyboard. By default, this single key/pedal is tailored to hide/show the desktop when you press it. But this little doodad can do considerably more than just that – see, you can bind any single key or standard Windows modifier keys to the pedal with any keystroke you like, and with any other modifiers you like (a modifier key is a special key on a computer keyboard that modifies the normal action of another key when the two are pressed in combination) which is probably all you want to do if you want the key/pedal to be an extra system control. Well, inspire others by telling the story about how you built this funny project. Good luck!
Also see https://www.codrey.com/arduino-projects/poor-mans-usb-rubber-ducky/