In this post, you will find the construction details of a crazy bomb timer that can be built with the help of a handful of common electronics components available everywhere. Well, get ready to entertain (or scare) kids with some electronics!
Beware, this is just a hobby electronics project. Nefarious use of this build may put you behind bars. Neither the author nor the publisher will be liable for any mishaps that may occur when you follow this concept!
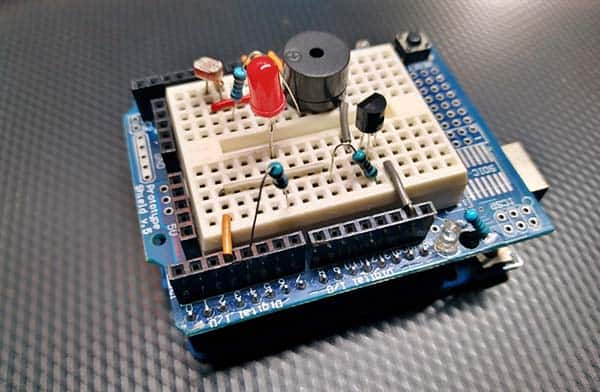
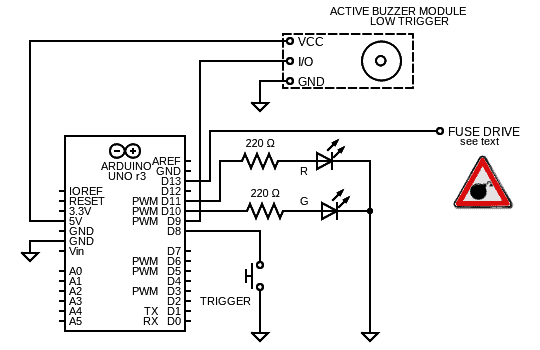
In this project, an Arduino Uno is used to ignite the bomb fuse. A pushbutton switch acts as the trigger/arm switch of the bomb timer. Additionally, a piezo buzzer and two LEDs are added for audio-visual announcements. The following schematic will give you a better idea about the bomb timer hardware setup.
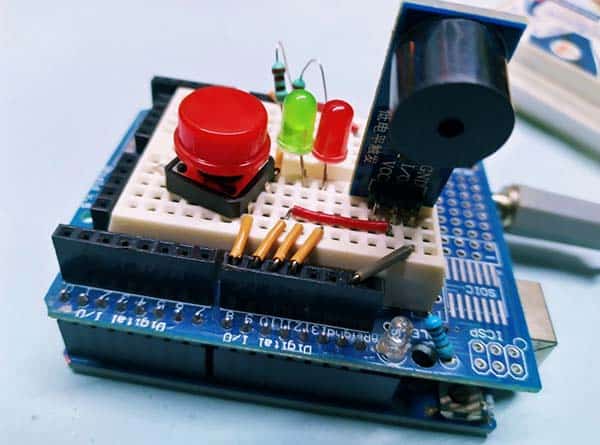
Now see the list of required components. Note that you can use an Arduino Nano or Pro Mini board instead of the Arduino Uno board without changing any of the other components in the basic schematic given above.
- 5mm Green LED x1
- 5mm Red LED x1
- 220Ω ¼ W Resistor x2
- Normally-Open Push Switch x1
- 5V Active Buzzer Module (LOW Trigger) x1
- Arduino Uno/Nano/Pro Mini (see text) x1
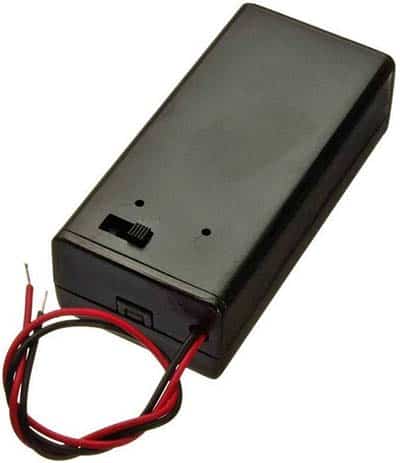
- 6F22 9V Battery x1
The D13 I/O of the Arduino Uno can be used to ignite the bomb fuse but this demands an appropriate driver circuit built around one NPN BJT or N-Channel Logic-Level MOSFET. I won’t give more details about it at present, it’s intentional. Therefore, just note that the onboard D13 LED will illuminate when the D13 I/O is ready to ignite the bomb fuse. That’s adequate for now.
Well, now you’ve a crazy bomb timer which’s capable of controlling an external driver circuit to ignite certain fireworks or bomb fuses leading to timed detonations. Note, that you can also use it for other applications that require a crude countdown timer. But never use it for malicious purposes. You’ve been warned!
int fuse = 13; //Fuse Pin
int buzzer = 9; //Buzzer Pin
int triggerPin = 8; //Trigger Pin
int greenLED = 10; //Green Indicator
int redLED = 11; //Red Indicator
int switchState = 0;

void setup( ) {
  pinMode(fuse, OUTPUT);
  pinMode(buzzer, OUTPUT);
  pinMode(greenLED, OUTPUT);
  pinMode(redLED, OUTPUT);
  pinMode(triggerPin, INPUT_PULLUP);
}

void loop( ) {
  switchState = digitalRead(triggerPin);

  if (switchState == LOW) {
    digitalWrite(greenLED, HIGH);
    digitalWrite(buzzer, LOW);
    delay(500);
    digitalWrite(buzzer, HIGH);
    delay(500);
    for (int i = 0; i < 3; i++) {
      digitalWrite(buzzer, LOW);
      delay(250);
      digitalWrite(buzzer, HIGH);
      delay(250);
    }
    for (int i = 0; i < 4; i++) {
      digitalWrite(buzzer, LOW);
      delay(167);
      digitalWrite(buzzer, HIGH);
      delay(167);
    }
    for (int i = 0; i < 5; i++) {
      digitalWrite(buzzer, LOW);
      delay(125);
      digitalWrite(buzzer, HIGH);
      delay(125);
    }
    for (int i = 0; i < 6; i++) {
      digitalWrite(buzzer, LOW);
      delay(100);
      digitalWrite(buzzer, HIGH);
      delay(100);
    }
    for (int i = 0; i < 7; i++) {
      digitalWrite(buzzer, LOW);
      delay(83);
      digitalWrite(buzzer, HIGH);
      delay(83);
    }
    for (int i = 0; i < 9; i++) {
      digitalWrite(buzzer, LOW);
      delay(62);
      digitalWrite(buzzer, HIGH);
      delay(62);
    }
    for (int i = 0; i < 11; i++) {
      digitalWrite(buzzer, LOW);
      delay(50);
      digitalWrite(buzzer, HIGH);
      delay(50);
    }
    for (int i = 0; i < 13; i++) {
      digitalWrite(buzzer, LOW);
      delay(42);
      digitalWrite(buzzer, HIGH);
      delay(42);
    }
    for (int i = 0; i < 16; i++) {
      digitalWrite(buzzer, LOW);
      delay(33);
      digitalWrite(buzzer, HIGH);
      delay(33);
      digitalWrite(buzzer, LOW);
      digitalWrite(greenLED, LOW);
      digitalWrite(redLED, HIGH);
      digitalWrite(fuse, HIGH); //Fuse Active
    }
    delay(1000);
    digitalWrite(buzzer, HIGH);
    digitalWrite(fuse, LOW);
    digitalWrite(redLED, LOW);
    delay(9000);
  } else {

    digitalWrite(buzzer, HIGH);

  }
}
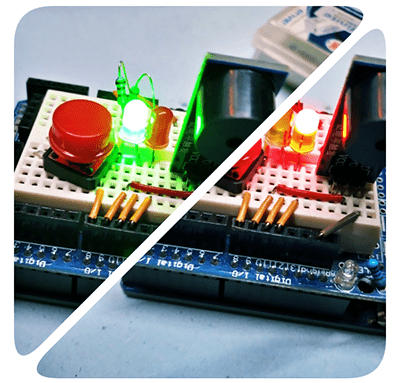
To get started, first power up your setup with the 9V battery and then press the trigger button. The green LED will light up instantly and the buzzer will start beeping (at an increasing gait) for a certain amount of time. Finally, the red LED takes over the green LED and the D13 output becomes “HIGH” for a while. This will ignite the bomb fuse wired into the setup without much delay.
Remember, you need to disconnect the battery to stop the timer/defuse the bomb after the trigger event. So, it’s a good idea to add a toggle switch to turn the system power on and off. Alternatively, you can use a 9V battery holder with an on/off switch (see below).
Finally, this is an idea that I’ve been bearing in my mind for a while since I’ve got interested in Pyrotechnics. More to come soon!