Arduino hardly needs an explanation! Arduino is an extremely flexible open source hardware platform that can be used for countless do-it-yourself electronic projects. It’s very easy to get started with Arduino projects, but if you are a novice then note that there’re various Arduino starter kits that set you on your way to becoming a master. There’s also a lot of easy to use Arduino shields and Arduino sensor kits that helps you make fantastic things. However it’s much more than that as once you get comfortable your creativeness is the only limit!
This article is certainly not a beginner’s guide to Arduino, rather it covers something useful about Arduino and analog sensors. As you play around with an Arduino, you’ll pick up plenty of great analog (and digital) sensors depending on what kind of projects you pursue. Okay, let me address one real-world issue that you may have to face up while you’re working with certain sensors, especially with some analog sensors. Here, I’d like to take an ordinary light dependent resistor (LDR) to provide a typical example.
Preparing a light sensor
Get a common GL5528 (5mm) LDR and a 10K (¼ w) resistor and wire them together as a potential divider. Then connect the potential divider’s output to one analog input (A0), and an LED (with a 1K series resistor) to one output (D9) of Arduino Uno board as shown in the figure below. Next upload the simple code and experiment around with the LDR i.e. orient it towards a light source or mask it with an opaque sheet. How the setup behaves?
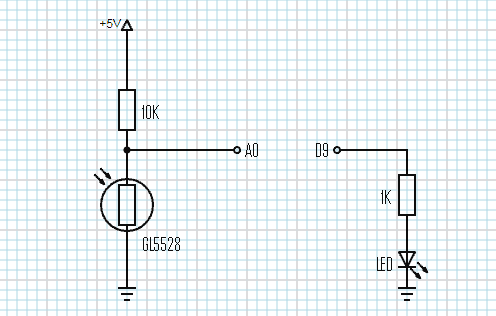
In the code analogRead() is used to read the value of LDR (ranges from 0 to 1023). Then map() function is used to re-map the number from one range to another so that the new value is proportionately equal to a value in between 0 and 255. As a result, the LED will get lighter or dimmer depending on the level of light the LDR observes.
int pinLED=9;
int pinLDR=A0;
void setup() {
//Nothing Here
}
void loop() {
int ldrValue=analogRead(pinLDR);
int ledValue=map(ldrValue,0,1023,0,255);
analogWrite(pinLED, ledValue);
delay(100);
}
Static to dynamic shift
The GL5528 LDR usually has a light resistance of 8 to 20KΩ at 10Lux, and a dark resistance greater than 1MΩ at 0Lux. Based on this, you can alter the first code to make an automatic night light so that when the LDR reading is higher than a certain threshold, the LED turns on, and below that value, it turns off. Seems simple but the set up might raise some issues when you’re running it in real-world (not in your workspace).
See, you’re using a pre-fixed threshold in your code that’s okay for most lab experiments, but you’ll probably have to vary the threshold in your code every time it’s been shifted to a different location to ensure that it works as devised. An easy way to solve this cumbersome issue is to modify the set up to change the threshold dynamically i.e. making the sensor interface merely adaptive. Fortunately, it’s very easy with the addition of a standard potentiometer, and a slightly-improved code!
int pinLED=9;
int pinLDR=A0;
int pinPot=A1;
void setup() {
pinMode(pinLED,OUTPUT);
}
void loop() {
int ldrValue=analogRead(pinLDR);
int threshold=analogRead(pinPot);
if(ldrValue<threshold){
digitalWrite(pinLED,LOW);
}else{
digitalWrite(pinLED,HIGH);
} delay(100);
}
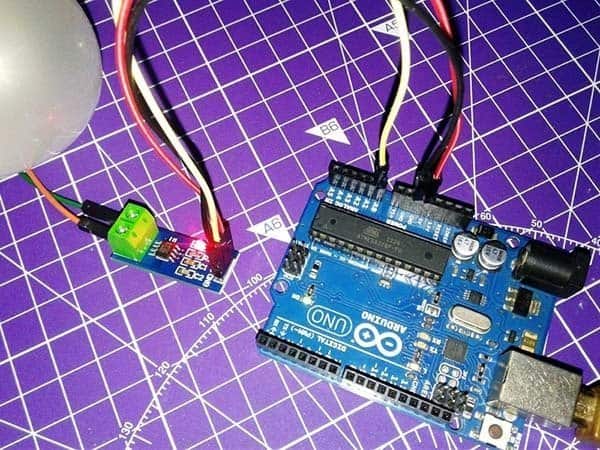
This little code assumes that you’ve already wired a 10K potentiometer/trimpot with another analog input (A1) of the Arduino Uno board in the same previous hardware set up (see next figure).
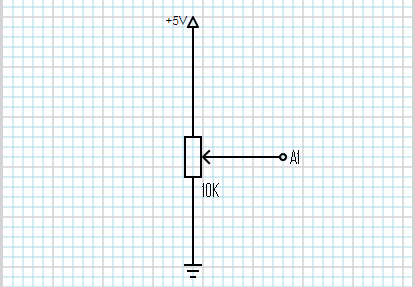
Now instead of changing the code every time, you can simply turn the knob of the potentiometer/trimpot until a desired level of ambient light triggers the setup.
Yup, you’ve just made one adaptive night light model that has got a dynamic light sensitive eye. This idea is obviously workable with a few other common analog sensors like photodiodes, thermistors, flex and force sensors, etc. Use it sagely when making similar adaptive sensor projects!
A few other simple sensors
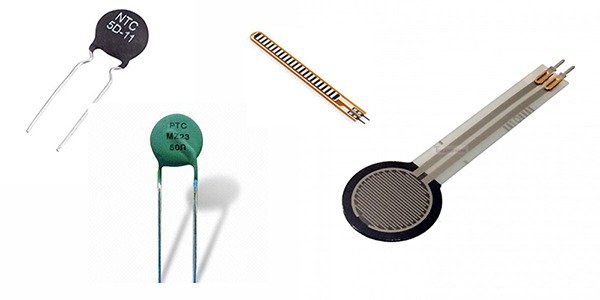
Yes, you know that the Light Dependent Resistor (LDR), also known as Photo-Resistor, is an extremely simple light sensitive sensor that changes its resistance with light. Next simple analog sensor is the Thermistor (thermal resistor) that changes it’s resistance based on temperature. There’re two common type thermistors – the positive temperature coefficient (PTC) type, and the negative temperature coefficient (NTC) type. Likewise, a Flex Sensor allows you to sense a flex (or bend) as it’s basically another variable resistor that simply reacts to bends. And, the next popular one is the Force Sensitive Resistor (FSR), which is exactly what it sounds like – a variable resistor that changes its resistance with applied force!
Finally, here’s another “sensor calibration” example that demonstrates one technique for calibrating a sensor input. It takes sensor readings for five seconds during the startup, and tracks the highest and lowest values it gets. The sensor readings during the first five seconds of the sketch execution define the minimum and maximum of expected values for the readings taken during the loop. If you want to get into, then go through this link https://www.arduino.cc/en/tutorial/calibration. That’s all for it!