Water Pressure Sensor is not a familiar everyday sensor for most electronics hobbyists and makers, so here’s an introductory tutorial on a popular water pressure sensor – the DFRobot Gravity: Analog Water Pressure Sensor. In this session, I’ll show you the basic sensor application and a simple demo on water pressure detection!
DFRobot Gravity – Introduction
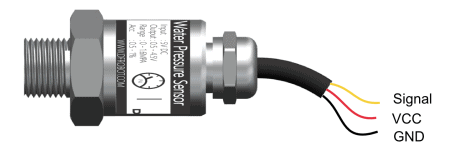
The analog water pressure sensor from DFRobot compatible with multiple Arduino controllers runs on standard 5V voltage dc input and gives 0.5~4.5V dc linear output. The sensor can be used for water pressure detection of living environmental water systems, such as houses, gardens, farms, and outdoor environment such as rivers, lakes, sea, etc. The sensor with a pressure measurement range of 0~1.6 MPa adopts the DFRobot Gravity 3-pin interface: SIGNAL (Y) –VCC (R) – GND (B).
For more details, refer – https://www.dfrobot.com/wiki/index.php/Gravity:_Water_Pressure_Sensor_SKU:_SEN0257
According to DFRobot, this analog water pressure sensor is a stethoscope to a water pipe helps you to diagnose whether there is water, how strong the water pressure is. It can be widely applied to smart home control systems (SCS), Internet of Things (IoT) and device detections. And by interfacing it with a Solenoid Valve and/or Water Turbine Generator we can build a smart water control system.
DFRobot Gravity – First Test
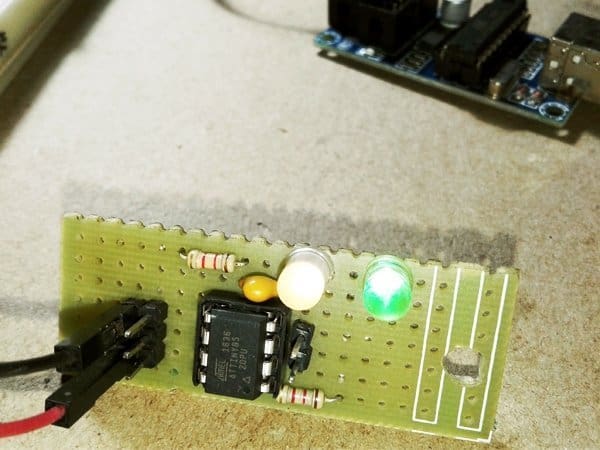
Although an Arduino is a quick solution for testing the water pressure sensor, I decided to build up a small module based on cheap analog components. Once I had the idea worked out I built a simple module with a bi-color LED provides a quick visual check, circuit of which is shown below.
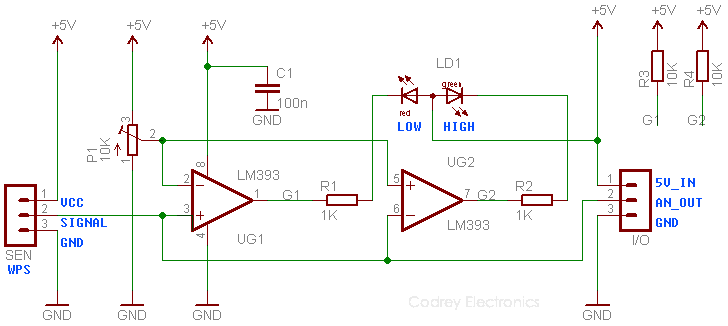
This one is driven by a 5v dc supply. The key component here is the LM393 dual- comparator, with same reference and threshold but inverted between comparators to “toggle” them in tune with the inputted pressure level. The reference/threshold level can be set using trimpot P1. Note that the output voltage of DFR analog water pressure sensor is 0.5~4.5V (0~1.6 MPa) with a nominal offset of 500mV. The “MPa” – megapascal – pressure unit is a x1000000 multiple of the Pascal unit which is the SI unit for pressure, and is mainly used to describe the pressure ranges and ratings of hydraulic systems.
Frankly, I’m too lazy to plumbery but I was keen to catch if my setup worked, so I blow gently on the sensor and got only a feeble response from the comparator (disquieted moments). Later I learned (from google) that the maximum lung pressure for an adult male during exhalation is close to 2.1psi (Pound-force per square inch), equivalent to 0.014478990288000001MPa, actually so small when compared to the DFR analog water pressure sensor’s measurement scale (0 ~ 232.06 psi / 0~1.6 MPa). Yes, that answers why I didn’t get a happy reading then. Quite a bit of work will be required to clear this in, and I might need to ask a plumber’s help to continue my experiments!
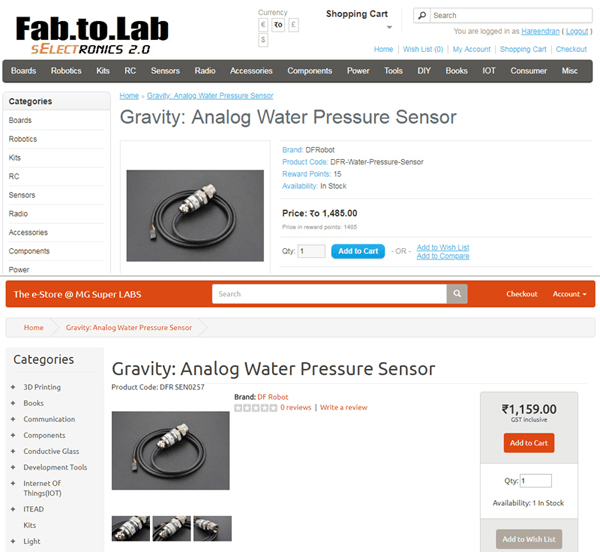
An unbiased hint: In India, you can pick the DFRobot Gravity: Analog Water Pressure Sensor from various online vendors including “Fab to Lab” and “MG Super Labs”. The unit price is in INR1000 to INR1500 range, but you may get it cheap from most Chinese vendors!
And finally here is a simple Arduino demo code to read the sensor data by Serial Port.
const float OffSet = 0.483 ; // See Calibration Note!
float V, P; // Voltage & Pressure
void setup()
{
Serial.begin(9600);
Serial.println("/** Water Pressure Sensor Data **/");
}
void loop()
{
//Connect sensor’s output (SIGNAL) to Analog 0
V = analogRead(0) * 5.00 / 1024;
P = (V - OffSet) * 400;
Serial.print("Voltage:");
Serial.print(V, 3);
Serial.println("V");
Serial.print(" Pressure:");
Serial.print(P, 1);
Serial.println(" KPa");
Serial.println();
delay(1000);
}
Calibration Note
The nominal output voltage offset of the sensor is 500mV, but due to the zero-drifting of the internal circuit this may varies and an initial calibration setup is required. For calibration, connect the sensor’s 3 pin cable (VCC, GND, and SIGNAL) to the Arduino (+5V, GND, and A0) without attaching the sensor to the water pipe and run your demo program for once. Write down the lowest voltage value through the serial monitor and revise the “const float OffSet” value to complete calibration. After calibration, the sensor is ready for the intended purpose!
is it hard to alter prog. to store peak pressures, caused by water hammer?
Not very hard, but you should write the code yourself based on the real-world application. Here’re some pointers seems helpful:
1. https://www.arduino.cc/en/Tutorial/Calibration
2. https://programmingelectronics.com/tutorial-22-calibration-old-version/
3. https://www.circuito.io/app?components=9442,11021,267055
Ray H, Thanks!
thanks for reply, TK,
i cant write code, analog tech only.
was hoping u could add in the requested feature.?
Did u see my comments / query re pulse counter?
Ray H
I’ll try to publish a revised design with the requested features after a short break.
Thank you for the cheering comments & suggestions 🙂
thanks TK, really appreciate prompt replies. Will plant a no. of sensors around house plumbing to try to find hammer cause. (Plumbers seem unable to pinpoint!)
(ideally each pressure peak would need millisec timestamp to be able to discern source of w/hammer.)
Can you share the results of measuring water pressure?
Steven: I will provide an update for this project in a few weeks as promised. It will also contain those test reports. Sorry for the inadvertent delay. Thanks!
Maybe the stupid question but I still learn how to correctly using it.
I put the sensor in a large water bottle (around 30cm depth) and read sensor shows all the time around 19.5kPa. if the bootle is half empty it is the same value (19.5kPa), even when I take it out from the bootle.
Why the value doesn’t change the pressure when there is a different level of water? I’d like to meassure water depth by its pressure
Please help!
Michat: This will work if your sensor is a DFR sensor. First, calibrate the sensor as described in the last paragraph. Possibility of errors, you are probably using long cables between the sensor and the microcontroller, or the sensor itself is faulty.
The most important thing is about its installation. See, this DFR sensor is intended to be used with water pipes, not water tanks. This is an installation example by DFRobotics https://wiki.dfrobot.com/Gravity__Water_Pressure_Sensor_SKU__SEN0257#target_6
hello, do you know if this sensor can be used by a raspberry pi4
sven jooken: Sadly, I don’t have an RPi4 to try this!
Anyway, I just made some comparisons with the GPIOs of regular Arduino boards, and observed that they can be somewhat similar for a few functionalities. But since the RPi4 GPIOs work at 3.3V, you’ll need to use a level shifter for 5V sensors.
Further, as far as I know, when we want to use an analog sensor, it’s necessary to use an external circuitry. Note, this sensor’s output is in 0.5 to 4.5V range (analog)!
This is the tech, specs about the sensor https://uploads.disquscdn.com/images/0a15172264057bbff161af010454d8c898ee4764c15e6d9c66aa61c20a5d1a78.png
Thanks you for the useful post. Your code differs from that of DFRobot:
yours: P = (V – OffSet) * 400;
DFRobot: P = (V – OffSet) * 250; (https://wiki.dfrobot.com/Gravity__Water_Pressure_Sensor_SKU__SEN0257)
Is there a reason why yours is different?
Thanks
Bryan