Arduino can make USB devices! What you simply needed for a USB HID (Human Interface Device) project is the Arduino Pro Micro (Leonardo) board. Today, I’ll be introducing that pretty great minuscule Arduino board available all over.
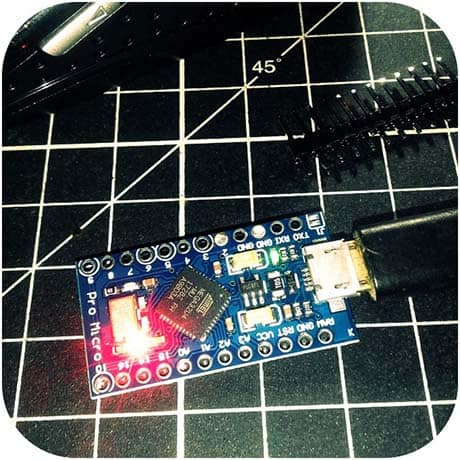
At first glimpse, it might look like the quite popular Arduino Pro Mini but actually Pro Micro is an extremely different kind Arduino. The Arduino Pro Micro (Leonardo) has an Atmega32U4 processor with a built-in USB-serial interface. The 32U4 comes with a full-speed USB transceiver interface, allowing you to program it to emulate any USB device. In simple terms, with a Pro Micro you can make your own keyboard, mouse, or other HID-class USB device at ease.
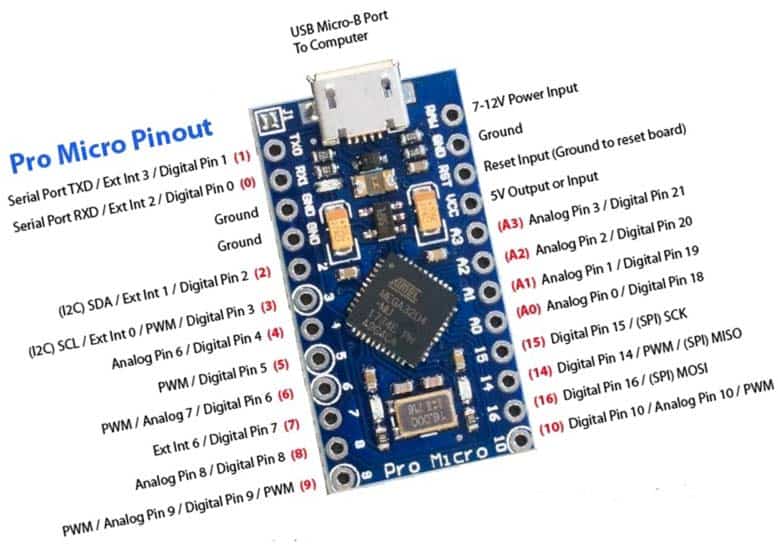
Below you can see the Pro Micro pinout diagram (gathered from the web).
Since it comes with the Atmega32U4 processor, you can connect Pro Micro to your desktop/laptop computer as usual, but it lets you play cheerfully with your smartphone/tablet too. Here you can find a relevant do it yourself project I got along in the year 2018 https://www.electroschematics.com/usb-hid-windows-android-keyboard
Before starting the first play, you must ‘introduce’ the Pro Micro to your computer and Arduino environment. On a Windows 10, the driver should automatically install, so you may not need to download the driver for the Atmega-32U4-based Arduino. If that is the case (lucky), you can move to installing the board addon for the Arduino IDE. Some users (like me) have experienced issues when plugging the Pro Micro into a USB 3.0 port. Never fear! If you experience issues on a USB 3.0 port, try switching to use a USB 2.0 port.
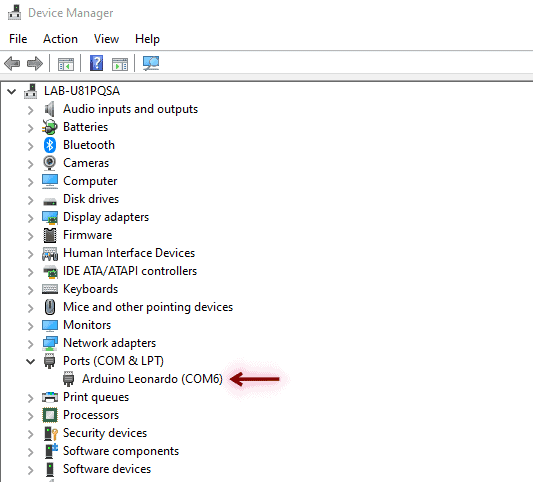
You should now be able to see your Pro Micro in the Device Manager (look below for a screen snip).
You should also see your Pro Micro’s COM port under the ‘Tools → Serial Port’ menu in the Arduino IDE (see the screen snip). Select it, and head over to the quick test example code provided below.

The “KeyboardSerial” example code (Thanks to Tom Igoe) reads a byte from the serial port and sends a keystroke back. The sent keystroke is one higher than what’s received, i.e. if you send t, you get u, send K, you get L, and so forth. On a side note, I used Arduino IDED 1.8.13 on a Windows 10 PC.
#include "Keyboard.h"

void setup() {
  // Open the serial port
Serial.begin(9600);
  // Initialize control over the keyboard
  Keyboard.begin();
}

void loop() {
  // Check for incoming serial data
  if (Serial.available() > 0) {
    // Read incoming serial data:
    char inChar = Serial.read();
    // Type the next ASCII value from what’s received!
    Keyboard.write(inChar + 1);
  }
}
If you’ve reached up to this moment, you’re lucky enough to begin your real play with the Pro Micro board being dealt with. Well done… now get started with your first piece of code. Best of luck with your Pro Micro projects!
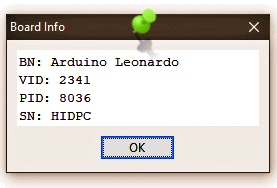
As an aside, our cyberspace is awash with dirt cheap “Pro Micro/Leonardo” boards. I’d successfully accomplished too many projects with those Chinese boards. Although not a big issue, more recently it’s been noticed that most of the Pro Micro boards when plugged into my Windows 10 PC seemed as Leonardo, while a few boards appeared as Pro Micro in the Device Manager window. As far as I know, the only way to distinguish would be from the device string in the USB enumerator (more on this later).
This is the screen snip of a Pro Micro’s board info, as disclosed by my Arduino IDE.
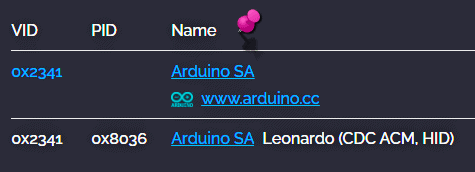
And, the search result returned by https://www.the-sz.com/products/usbid/
The mysterious jumper J1
Now a few words about the mysterious jumper J1.
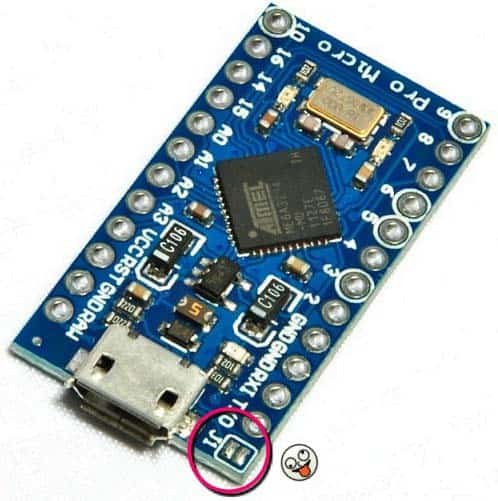
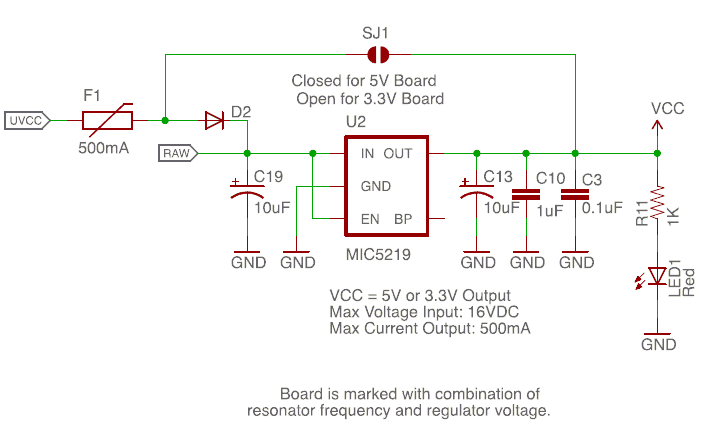
On Spark Fun genuine boards, this jumper J1 just bypasses the inbuilt voltage regulator as can be seen from the below schematic snip. Looking at the Spark Fun schematic, the Arduino Pro Micro can have either a 5V or 3.3V voltage regulator on it, the jumper can just bypass that onboard 3.3V regulator. However, I clearly noticed that my Pro Micro clone, even being 5V (16MHz resonator), has the J1 jumper open, and there’s a 5V regulator (Not 3.3V) marked as S8PL.
At first, I too think that J1 is to choose what voltage I want to operate. But this is true only for genuine boards (Similar to SF Pro Micro) with 3.3V voltage regulator. But if you’re using the 5V clone version, J1 doesn’t make any sense. You can of course use a 3.3V regulator in lieu of the 5V regulator in your Pro Micro clone if you’re adept in soldering arts. But you must change the 16MHz resonator with an 8MHz one, and reprogram 32U4 to meet the new frequency. Keep in mind, if the effort brings no fruitful outcome it is a waste!
Well, this time you only just met the Arduino Pro Micro/Leonardo. Next time, I’ll take you to a more exciting level. A new project awaits me!
Related Links
- Atmega32U4 Datasheet http://cdn.sparkfun.com/datasheets/Dev/Arduino/Boards/ATMega32U4.pdf
- 32U4 Firmware Notes https://cdn.sparkfun.com/datasheets/Dev/Arduino/Boards/32U4Note.pdf
- Pro Micro Graphical Datasheet https://cdn.sparkfun.com/assets/f/d/8/0/d/ProMicro16MHzv2.pdf
- Recover Arduino Pro Micro https://www.coreforge.com/blog/2014/09/recovering-arduino-pro-micro-atmega32u4/
- USB HID Project (1) https://www.codrey.com/arduino-projects/tiny-usb-windows-key/
- USB HID Project (2) https://www.codrey.com/arduino-projects/poor-mans-usb-rubber-ducky/