This little post covers the construction details of sound reactive pixels which is pretty enjoyable to build and watch. You can embed it in a lot of things, for example, think about gluing it in your next Christmas tree!![]()
This is what you’ll need:
- Arduino Uno or Nano
- WS2812B NeoPixel LED ring/stick/strip
- Sound Sensor Module with Analog Output (AO)
- 5V (≥2A) LED SMPS (optional – see notes)
Of course, a couple of the usual prototyping accessories will be required as well.
NeoPixel LEDs are pretty smart minuscule addressable devices, and little effort is needed to set up and run because you need only one I/O of your microcontroller to control them all in a vigorous manner.
Okay, let’s start with this WS2812FX Arduino Example Sketch:
#include <WS2812FX.h> // NeoPixel Library

#define LED_PIN          4  // NeoPixel Control-D4
#define LED_COUNT      8  // NeoPixel Count-8

#define MIN_BRIGHTNESS   1
#define MAX_BRIGHTNESS 128 // Maximum-255
#define THRESHOLD        5

WS2812FX ws2812fx = WS2812FX(LED_COUNT, LED_PIN, NEO_GRB + NEO_KHZ800);

uint16_t quietLevel = 0;
uint16_t maxSample = 0;
uint16_t maxSampleEver = 0;
unsigned long timer = 0;

void setup() {
  Serial.begin(115200);

  // Initial audio measurements to establish the quiet level
  for (int i = 0; i < 20; i++) {
    quietLevel += analogRead(A0); // 0-1023
    delay(25);
  }
  quietLevel /= 20;
  Serial.print("\nquietLevel is "); Serial.println(quietLevel);

  ws2812fx.init();
  ws2812fx.setBrightness(64);

  // Parameters: index, start, stop, mode, color, speed, reverse
  ws2812fx.setSegment(0,  0,  LED_COUNT - 1, FX_MODE_STATIC, GREEN, 8000, NO_OPTIONS);

  ws2812fx.start();
}

void loop() {
  // Take an audio sample
  uint16_t audioSample = abs(analogRead(A0) - quietLevel);//Audio Input-A0
  if (audioSample > maxSample) maxSample = audioSample;

  // if the timer has expired, use the sampled audio to recalculate the LED brightness
  if (millis() > timer) {
    if (maxSample > THRESHOLD) { // ensure the audio is above the threshold to reduce LED flickering
      if (maxSample > maxSampleEver) maxSampleEver = maxSample;

      // Calculate a new brightness, properly scaled to the sampled audio
      uint8_t newBrightness = map(maxSample, THRESHOLD, maxSampleEver, MIN_BRIGHTNESS, MAX_BRIGHTNESS);
      //    Serial.print("maxSample:");Serial.print(maxSample); // debug
      //    Serial.print(", maxSampleEver:");Serial.print(maxSampleEver);
      //    Serial.print(", newBrightness:");Serial.println(newBrightness);
      ws2812fx.setBrightness(newBrightness);
    } else {
      ws2812fx.setBrightness(MIN_BRIGHTNESS);
    }

    maxSample = 0;
    timer = millis() + 100; // Recalculate brightness every 100ms
  }

  ws2812fx.service();
}
As you might be observed, the above example code is backed by a dedicated Arduino NeoPixel Library “WS2812FX”. This library offers a variety of lighting effects for the WS281x /NeoPixel LEDs. It is meant to be a drop-in replacement for the Adafruit NeoPixel library with additional features.
![]()
You can search for “WS2812FX” in the Arduino Library Manager or download and install the latest version manually through this GitHub link https://github.com/kitesurfer1404/WS2812FX/archive/refs/heads/master.zip
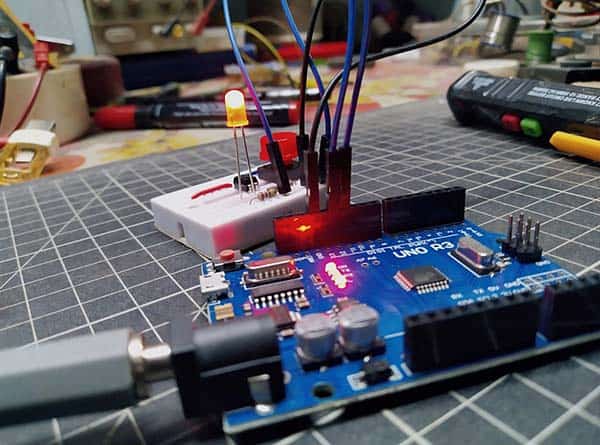
A WS2812-8 addressable RGB LED stick is picked here for the experiments because it’s the only addressable LED module ready to hand at that time. Note that these compact 8-LED addressable sticks can easily be daisy-chained to make more bombastic displays.

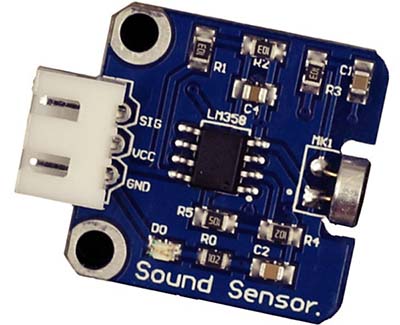
The sound sensor module provides an easy way to detect sound and is generally used for detecting sound intensity. It uses an electret condenser microphone (ECM) and an appropriate microphone preamplifier to deliver a sensible audio signal output for further processing by external electronic circuitry. In a simple manner, a sound sensor module detects sound waves and converting them to electrical signals.
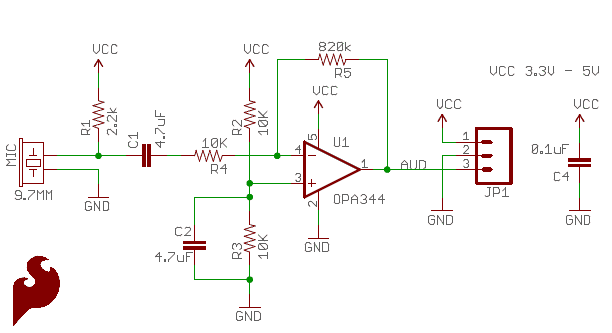
This is the schematic of the quite popular “SparkFun Electret Microphone Breakout” which couples an Electret microphone (100Hz–10kHz) with a 60x microphone preamplifier (https://learn.sparkfun.com/tutorials/electret-mic-breakout-board-hookup-guide).
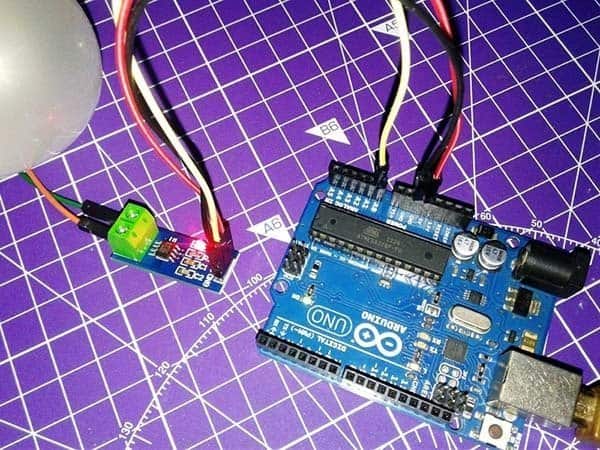
Let’s get back to the project. Below is the Arduino Uno hardware setup diagram. At this point, note that a Grove Sound Sensor module is used as the sound detector, though it is not very critical (feel free to use your trusty one).
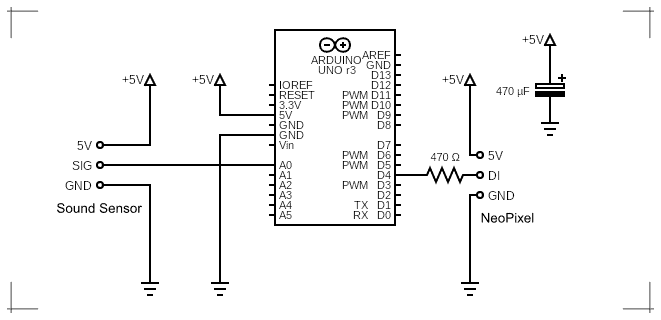
As a word of warning, the Arduino Uno features a number of power input options – DC In/USB/Vin/5V. The 5V pin outputs a regulated 5VDC from the voltage regulator on the board. This pin can be supplied with power either from the DC barrel adaptor, the USB connector, or the Vin pin of the board. You can supply regulated 5VDC via the 5V pin too, however, this bypasses the onboard regulator and protection features, and can damage your board!
If you only need to power a single WS2812-8 LED stick, you can actually get away with using only the Arduino. The USB plugged into your computer can provide 500mA of power. I wouldn’t recommend using much more than 400mA but it is enough to neatly power the entire hardware setup described above. To power additional LEDs, you will need a quality external 5VDC power source.
![]()
A parting thought!
Honestly, you should spend considerable time studying the WS2812FX library and changing its examples, but it will be worthful. Anyway, here’s another Arduino code (Originally prepared for NeoPixel Rings/Wheels) that can be used for the same Arduino audio-reactive pixel setup. You only need to alter the noise level (# 1 noise level 255) in the code to match your specific sound sensor module, that’s all.
#include <Adafruit_NeoPixel.h>

#define MIC A0 // Audio In = A0
#define LED_PIN 4 // NeoPixel DI = D4
#define N_PIXELS 8 // Total Pixels = 8
#define N 100 // Total Samples
#define fadeDelay 10 // Fade Amount
#define noiseLevel 255 // See Note!

Adafruit_NeoPixel strip = Adafruit_NeoPixel(N_PIXELS, LED_PIN, NEO_GRB + NEO_KHZ800);

int samples[N];
int periodFactor = 0;
int t1 = -1;
int T;
int slope;
byte periodChanged = 0;


void setup() {
  strip.begin();
  ledsOff();
  delay(500);
  displayColor(Wheel(100));
  strip.show();
  delay(500);
}


void loop() {
  Samples();
}

void Samples() {
  for (int i = 0; i < N; i++) {
    samples[i] = analogRead(0);
    if (i > 0) {
      slope = samples[i] - samples[i - 1];
    }
    else {
      slope = samples[i] - samples[N - 1];
    }

    if (abs(slope) > noiseLevel) {
      if (slope < 0) {
        calculatePeriod(i);
        if (periodChanged == 1) {
          displayColor(getColor(T));
        }
      }
    }
    else {
      ledsOff();
    }
    periodFactor += 1;
    delay(1);
  }
}

void calculatePeriod(int i) {
  if (t1 == -1) {

    t1 = i;
  }
  else {

    int period = periodFactor * (i - t1);
    periodChanged = T == period ? 0 : 1;
    T = period;
    t1 = i;
    periodFactor = 0;
  }
}

uint32_t getColor(int period) {
  if (period == -1)
    return Wheel(0);
  else if (period > 400)
    return Wheel(5);
  else
    return Wheel(map(-1 * period, -400, -1, 50, 255));
}

void fadeOut()
{
  for (int i = 0; i < 5; i++) {
    strip.setBrightness(110 - i * 20);
    strip.show(); // Update strip
    delay(fadeDelay);
    periodFactor += fadeDelay;
  }
}

void fadeIn() {
  strip.setBrightness(100);
  strip.show();

  for (int i = 0; i < 5; i++) {
    //strip.setBrightness(20*i + 30);
    //strip.show();
    delay(fadeDelay);
    periodFactor += fadeDelay;
  }
}

void ledsOff() {
  fadeOut();
  for (int i = 0; i < N_PIXELS; i++) {
    strip.setPixelColor(i, 0, 0, 0);
  }
}

void displayColor(uint32_t color) {
  for (int i = 0; i < N_PIXELS; i++) {
    strip.setPixelColor(i, color);
  }
  fadeIn();
}


uint32_t Wheel(byte WheelPos) {
  if (WheelPos < 85) {

    return strip.Color(WheelPos * 3, 255 - WheelPos * 3, 0);
  }
  else if (WheelPos < 170) {
    WheelPos -= 85;
    return strip.Color(255 - WheelPos * 3, 0, WheelPos * 3);
  }
  else {
    WheelPos -= 170;
    return strip.Color(0, WheelPos * 3, 255 - WheelPos * 3);
  }
}
Finally, While this project didn’t gain as much beauty as I thought it might have, I found it worthwhile all the same. Okay, now improve your prototype by adding new features and functionalities to the hardware and software. And get festive with some sound reactive pixels!