After a little bit of research, I discovered that building a portable ultrasonic distance meter using Arduino was indeed a very simple task. I was surprised to discover that integrating a tiny OLED display into the Arduino setup was another interesting thing as well. And I’m done!
Below you can see the simplistic code that I formulated for that day.
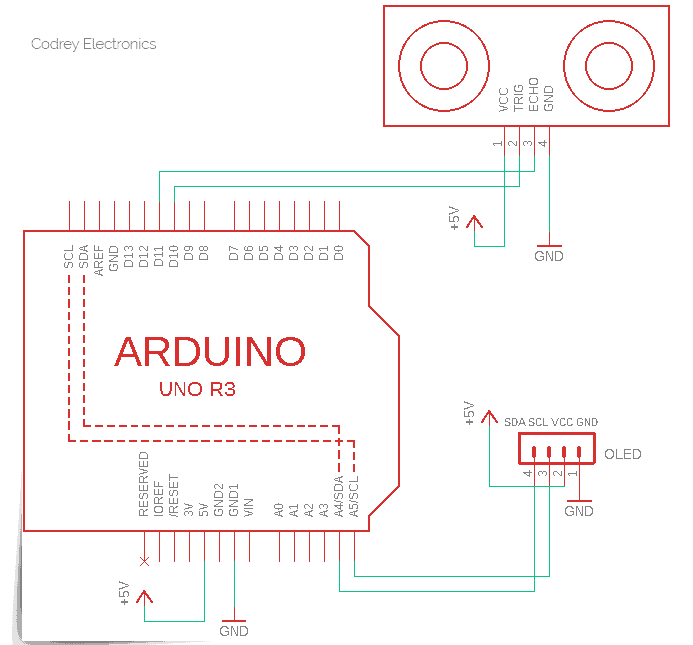
#define TRIG_PIN 10
//US Sensor TRIG PIN = D10
#define ECHO_PIN 11
//US Sensor's ECHO PIN = D11
//US Sensor & OLED Display @5V
//OLED's SDA=A4
//OLED's SCL=A5
#include <Wire.h>
#include <Adafruit_GFX.h>
#include <Adafruit_SSD1306.h>
#define SCREEN_WIDTH 128
#define SCREEN_HEIGHT 32
Adafruit_SSD1306 display(SCREEN_WIDTH, SCREEN_HEIGHT, &Wire);
int distance_mm;
unsigned long measured_time;
void setup() {
pinMode(TRIG_PIN, OUTPUT);
pinMode(ECHO_PIN, INPUT);
Serial.begin(9600);
if (!display.begin(SSD1306_SWITCHCAPVCC, 0x3C)) {
Serial.println(F("SSD1306 Allocation Failed"));
for (;;);
}
display.clearDisplay();
display.setTextColor(WHITE);
display.setCursor(32, 12);
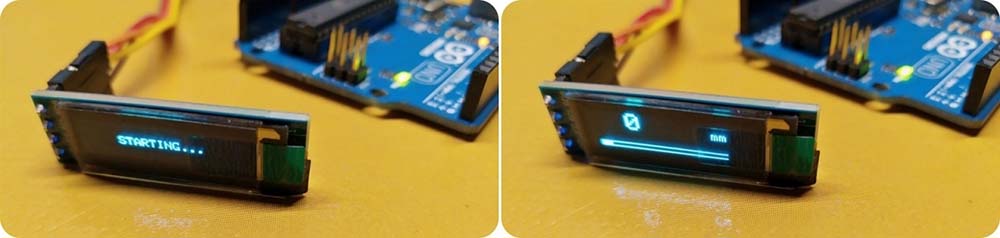
display.print("STARTING...");
display.display();
delay(2000);
}
void loop() {
digitalWrite(TRIG_PIN, HIGH);
delayMicroseconds(20);
digitalWrite(TRIG_PIN, LOW);
measured_time = pulseIn(ECHO_PIN, HIGH);
distance_mm = (int)((float)measured_time / 5.83);
display.clearDisplay();
display.setTextColor(WHITE);
display.setCursor(8, 0);
display.setTextSize(2);
if (distance_mm < 100) display.print(" ");
if (distance_mm < 10) display.print(" ");
display.print(distance_mm);
display.setTextSize(1);
display.setCursor(97, 8);
display.print("mm");
display.drawLine(8, 27, 108, 27, WHITE); // 1000mm Bar graph
display.fillRect(8, 28, 8 + int(distance_mm + 0.5) / 10, 30, WHITE);
display.drawLine(8, 31, 108, 31, WHITE);
display.display();
delay(200);
}
To get this working, a couple of libraries need to be included. The Wire library for I2C communication is already available in the Arduino IDE. The SSD1306 and the GFX library you’ll have to install yourselves. Likewise, 0x3C is the I2C address of the 128×32 OLED display. Most times this will work out of the box. In case it does not work see if you can find any address printed on the OLED module.
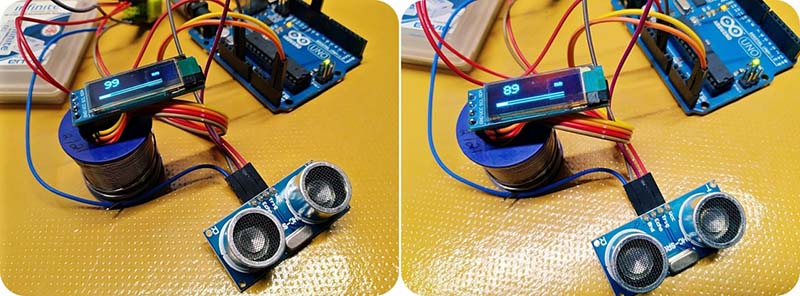
The OLED display shows the distance measured and a fancy bar graph!
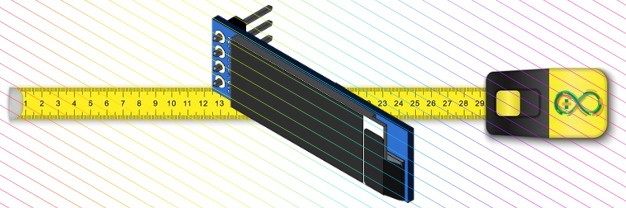
The basic hardware setup was simple enough as well. An Arduino Uno was used at that time, together with a 128×32 I2C OLED display, HC-SR04 ultrasonic sensor module, and a 9V lithium-ion rechargeable battery, I had myself a handheld ultrasonic distance meter!
For your convenience, I’ll give you the purchase list again here. Get ready for an evening walk to buy them all!
The HC-SR04 (https://cdn.sparkfun.com/datasheets/Sensors/Proximity/HCSR04.pdf) contains an ultrasonic transmitter (T) and receiver (R). When you supply a short (10uS) pulse to its Trigger input to start the ranging process, it transmits 8 sonic bursts at 40kHz and then measures the time it takes the echo to return. You can measure this time via the pulse on the Echo output that has exactly the same duration.
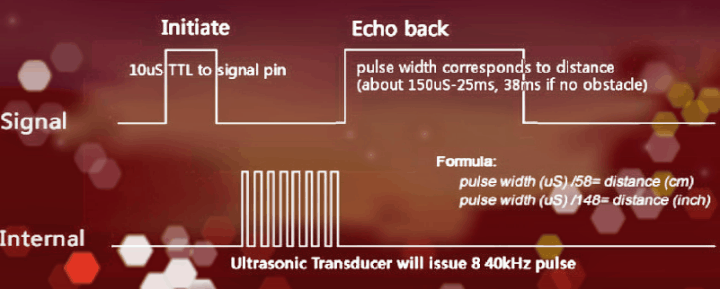
In order to calculate the distance of the object that reflected the transmitted sound, you need to do some calculations with the speed of sound in air (343m/s @ 20°C). To derive the travel distance in mm, do multiply the measured time by 0.343 and then divide by 2 to get the actual distance of the object.
My first task that day was to get a crude prototype to be tested on my workbench. In not much time I’d managed to wire up the components, and I had an Arduino thing that worked.
Once the agile test finished, I gave the prototype a new look by putting it inside a soapbox and that should have been where I stopped.
But I didn’t stop there. In the end, I decided to rebuild my prototype by following the same design idea but with an Arduino Nano and a 3D-printed enclosure (more later). And, it worked well enough for that day, and that’s all that mattered.
Get going now…
Now it’s your turn! So, rig up your own little ultrasonic distance meter, make any changes you find necessary and run the build. Make sure you read related articles posted here for some inspiration on how you might modify your design to improve its functionality. As always, if you have any questions then start the conversation below. I’m a full-time maker and happy to help. All the best with your projects!

Can this be adapted to show the voltage on an analog input pin?
I want to make a bar meter signal strength display.
I am very much a noob.
Michael: Not tried this with LEDs/LED bar graph yet, but you may follow this concept https://www.instructables.com/Distance-Sensor-with-LEDs-and-buzzer/ Good luck!