Feeding birds everyday will go a long way in the conservation of birds. So just remember that by installing a nest box in your garden you are actively participating in bringing about a vast change in the conservation movement. Also, when you set up a beauteous bird feeder you are creating a birds sanctuary around your home. Interesting? Then read on…
Arduino Bird Feeder Servo
In this article, we will put our attention on the build of a simple Arduino controlled bird feeder. The principal part of the proposed automatic bird feeder is a customized mechanical lid functioned by a servo which is entirely commanded by an Arduino microcontroller – thus the title “Arduino Bird Feeder Servo”!
For the reason that the core part here is a servo-controlled mechanism, let’s start with the servo. As you might guessed, the extremely cheap and compact servo suitable for this project is the “SG90 9g Micro Servo”. The tiny and lightweight servo comes with three horns (plus mounting hardware) and works just like the standard servo that rotates 180° (90° in each direction).

Arduino’s dedicated servo library makes it easier to handle servos with the least possible code and complications. Note that most common servos accept inputs from 1000μs to 2000μs, with 1500μs corresponding to the center position. For a 0-180° servo, this would be 90°. In practice, the attached servo will adjust to its center position, but perhaps not exactly!
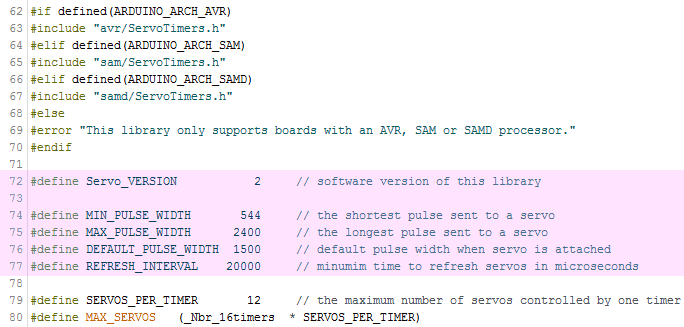
Actually, the minimum pulse width default in the Arduino servo library is defined to be 544 μs, and the maximum is defined to be 2400 μs (see below). Listen, these values seem outside of the 1000 μs and 2000 μs parameters. Don’t worry if it doesn’t make sense – just take note of these numbers as you might need them later.
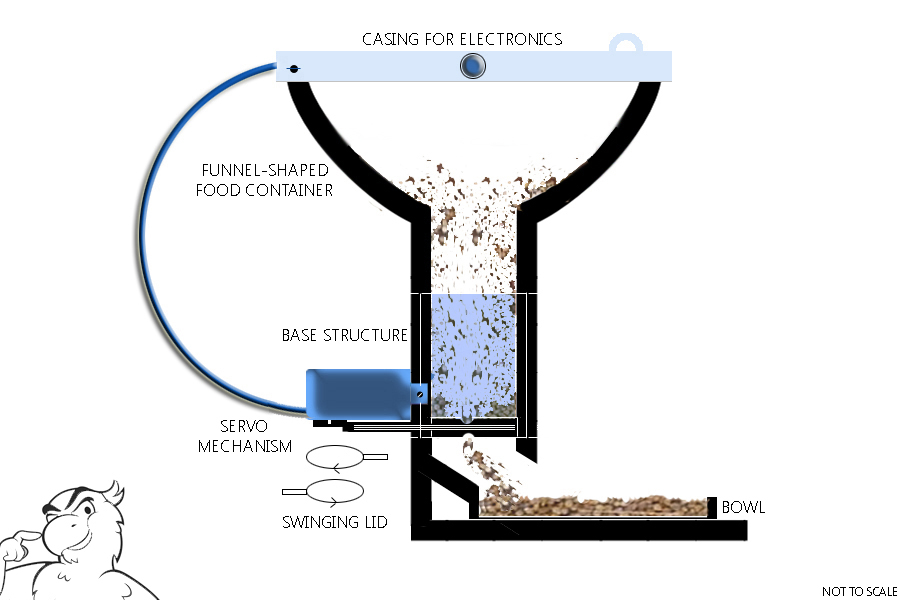
The general design of the automatic bird feeder engine I envisaged is a funnel-shaped food container that leads down into a plastic tube, and out into the food bowl. The servo motor with a suitable lid (perhaps homemade) attached to its arm is mounted on the base structure and is able to swing the lid through the cut out slit in the plastic tube. You need to give the mechanics a good think but in the end you will definitely get a great automatic bird feeder engine with a better steering performance.
The bird feeder automatically feeds a random, but a small portion of food grain at a given interval (a few treats over a shorter period of time) defined in the code. The setup also has a momentary push button to do the manual feed of a single portion. Frankly, a simple bird feeder similar to this doesn’t need a microcontroller as it can use a crude timer module. With a microcontroller, however, the bird feeder becomes more flexible and you can do lots of pretty cool expansions which you otherwise can’t.
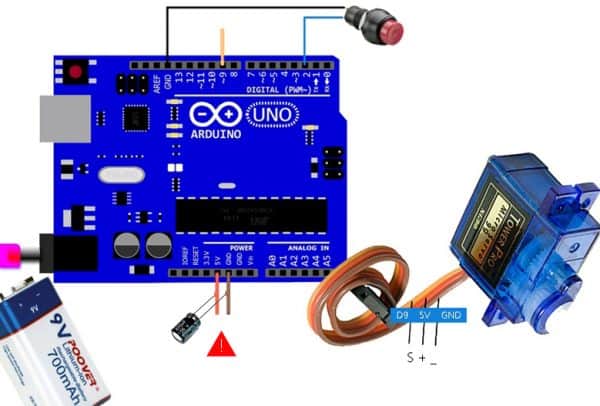
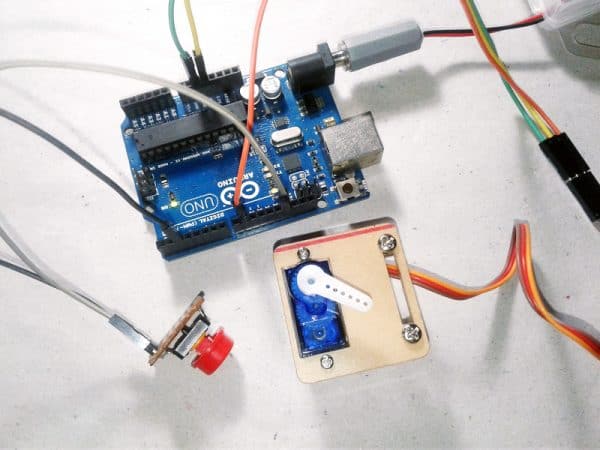
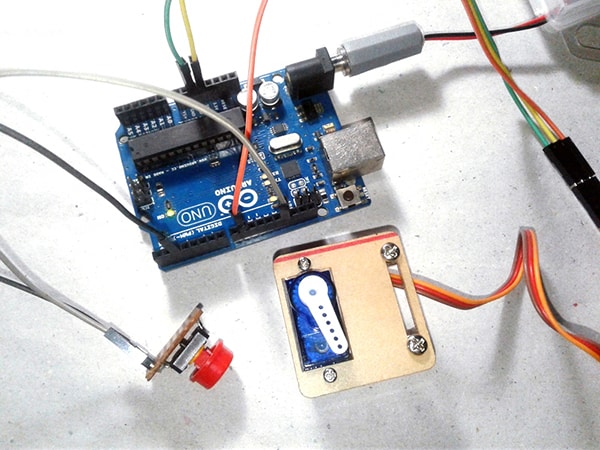
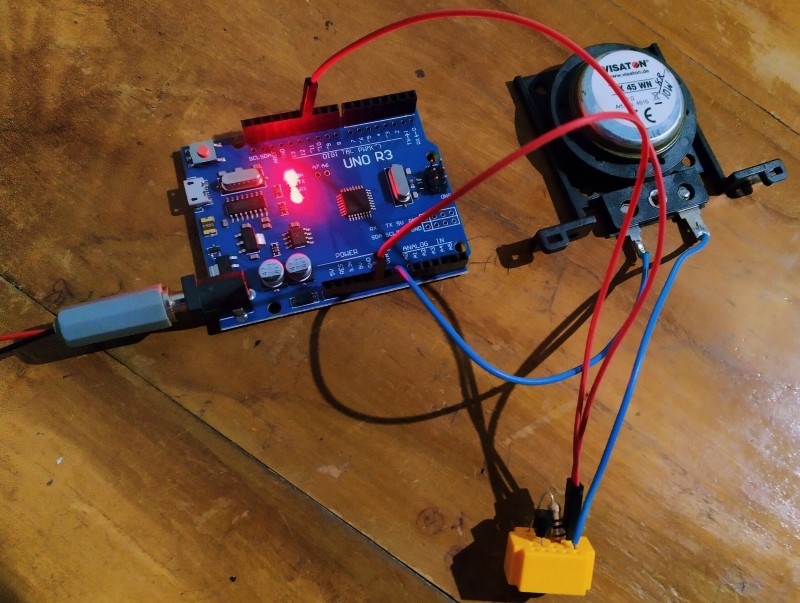
Now see the ridiculously simple hardware setup, configured to run on a rechargeable 9V battery. If you find your Arduino is unable to power the servo, an additional 5VDC power source must be employed for the servo.
No miracle happens in the code. Simply you can see the millis() function for the timer, and a pin interrupt for the ‘manual feed’ push button. At this point, keep an eye on the pertained code lines to change the sweep angle values with new numbers suited particularly for the mechanics of your bird feeder engine. I still need to test this concept more extensively in my habitat, but from a technical standpoint, it is playing very well at the moment.
#include <Servo.h >

#define SW_INTERVAL_MS    90000
#define SERVO_START         100
#define SERVO_STOP           50
#define PIN_SERVO           9
#define PIN_BUTTON       2

Servo myservo;

byte switch_flag = 0;
int pos = 0;
unsigned long time_now = 0;

void setup(){
    myservo.attach(PIN_SERVO);
    pinMode(PIN_BUTTON, INPUT_PULLUP);
    attachInterrupt(digitalPinToInterrupt(PIN_BUTTON), myISR, LOW);

    pos = SERVO_START;
    myservo.write(pos);
}

void loop(){
    if(millis() > (time_now + (SW_INTERVAL_MS))){
        time_now = millis();
       switch_flag = 1;
    }

    if(switch_flag){
        drive();
        switch_flag = 0;
    }
}

void myISR(){
    switch_flag = 1;
}

void drive(){
    for (pos = SERVO_START; pos >= SERVO_STOP; pos--) {
        myservo.write(pos);
        delay(15);
    }
    for (pos = SERVO_STOP; pos <= SERVO_START; pos++) {
        myservo.write(pos);
        delay(15);
    }
}
I carried out several experiments on an ‘pen-air’ hardware setup of the bird feeder engine with the above code templet. See my lab snaps!
Side note: Your servo may behave erratically if it draws quite a lot of power during start up. If this happens, then you can cure it by adding one 470uF electrolytic capacitor between 5V and GND rails as pointed in the hardware setup diagram. Further, it has come to my attention that there’s a need to debounce the ‘manual feed’ button switch. There’re so many ways to software debounce – simply try any of the debounce code in the Arduino tutorials. But in this project, you don’t want to spend your time in the interrupt routine to debounce a switch, better do it in hardware http://www.all-electric.com/schematic/debounce.htm
Add-ons for the next version
- A load cell to sense the weight of the food bowl so that the feeder engine can refill the seeds based on weight rather than based on time
- A solar panel based power supply with battery backup to lengthen the run time of the bird feeder in the field
- A bird bath pump/fountain integrated with a presence sensor mechanism
- A wireless link for remote monitoring and controlling of the system installed in a distant location
Wrapping up
Now that you get the idea of a poor man’s automatic bird feeder, try modeling a nifty one yourself. I hope you found this little guide useful. Have fun playing with microcontrollers and servo motors!
Lead image from https://www.gardengatemagazine.com/articles/projects/all/diy-terra-cotta-bird-feeder/
Nice article.
What next – Remote controlled switch to turn the servo on / off ? so that you watch from the safety of the home and as soon as you see the bird fly-in, you enable the switch to turn or enable the feeder 🙂
Nevertheless, Good article. Enjoyed reading it.
Shashi Kiran: I’ve had some plans as pointed in the last section of the post. There’re so many bird lovers in my village, and hence my next version will be a feature-rich and customized bird feeder. Thanks a lot for your comments!
BTW, see a related village snap https://keralaagriculture.gov.in/wp-content/uploads/2018/12/slid2.jpg