 Happy Xmas is near, so it’s time to build your own festive lights to surprise your neighbors. In this post, you will learn how to make Christmas special LED pixels with Raspberry Pi Pico!
First off, gather these key things to follow the project…
- Raspberry Pi Pico
- WS2812 RGB LEDs/LED Modules/LED Sticks/LED strips
- 5V SMPS for the WS2812 (NeoPixel) LEDs of your choice
3-Pin Male & Female JST connectors for Pixel LEDs (optional)
![]()
Next, prepare the hardware as shown in the schematic diagram below.
![]()
Since the Rpi Pico is a 3.3V microcontroller, often you need a “logic level translator” (https://learn.sparkfun.com/tutorials/bi-directional-logic-level-converter-hookup-guide/all) in between the Rpi Pico microcontroller and the Pixel LEDs. However, it’s noticed that most WS2812B LEDs will work reliably with the Rpi Pico’s 3.3V logic level. If so (you’re lucky), skip that translator circuit and connect the pins directly.
See, according to Rpi Pico manual, the 3V3 pin is the main 3.3VDC supply to RP2040 and its I/O, generated by the on-board power supply circuitry. This pin can be used to power external circuitry but it is advised to keep the load on this pin less than 300mA as the maximum output current will depend on RP2040 load and VSYS voltage!
And then, create a new script in Thonny to copy-paste the following code. If you haven’t already set up Thonny for programming your Rpi Pico, do it first by going back to the previous RPi Pico projects posted here.
#
import array, time
from machine import Pin
import rp2

#
############################################
# RP2040 PIO and Pin Configurations
############################################
#
# WS2812 LED Configuration
led_count = 8 # Number of NeoPixels
PIN_NUM = 22 # DI pin for NeoPixels
brightness = 0.5 # 0.1 = darker, 1.0 = brightest
@rp2.asm_pio(sideset_init=rp2.PIO.OUT_LOW, out_shiftdir=rp2.PIO.SHIFT_LEFT,
             autopull=True, pull_thresh=24) # PIO configuration

# Define WS2812 parameters
def ws2812():
    T1 = 2
    T2 = 5
    T3 = 3
    wrap_target()
    label("bitloop")
    out(x, 1)               .side(0)    [T3 - 1]
    jmp(not_x, "do_zero")   .side(1)    [T1 - 1]
    jmp("bitloop")          .side(1)    [T2 - 1]
    label("do_zero")
    nop()                   .side(0)    [T2 - 1]
    wrap()


# Create the StateMachine with the ws2812 program, outputting on pre-defined pin
# @ 8MHz frequency
sm = rp2.StateMachine(0, ws2812, freq=8_000_000, sideset_base=Pin(PIN_NUM))

# Activate the state machine
sm.active(1)

# Range of LEDs stored in an array
ar = array.array("I", [0 for _ in range(led_count)])
#
############################################
# Functions for RGB Coloring
############################################
#
def pixels_show(brightness_input=brightness):
    dimmer_ar = array.array("I", [0 for _ in range(led_count)])
    for ii,cc in enumerate(ar):
        r = int(((cc >> 8) & 0xFF) * brightness_input) # 8-bit red dimmed to brightness
        g = int(((cc >> 16) & 0xFF) * brightness_input) # 8-bit green dimmed to brightness
        b = int((cc & 0xFF) * brightness_input) # 8-bit blue dimmed to brightness
        dimmer_ar[ii] = (g<<16) + (r<<8) + b # 24-bit color dimmed to brightness
    sm.put(dimmer_ar, 8) # Update the state machine with new colors
    time.sleep_ms(10)

def pixels_set(i, color):
    ar[i] = (color[1]<<16) + (color[0]<<8) + color[2] # Set 24-bit color

def breathing_led(color):
    step = 5
    breath_amps = [ii for ii in range(0,255,step)]
    breath_amps.extend([ii for ii in range(255,-1,-step)])
    for ii in breath_amps:
        for jj in range(len(ar)):
            pixels_set(jj, color) # Show all colors
        pixels_show(ii/255)
        time.sleep(0.02)
#
############################################
# Main Calls and Loops
############################################
#
# Color specifications
red = (255,0,0)
green = (0,255,0)
blue = (0,0,255)
yellow = (255,255,0)
cyan = (0,255,255)
pink = (255,0,255)
white = (255,255,255)
black = (0,0,0)
colors = [blue,yellow,cyan,red,green,pink,white]

while True: # Loop indefinitely
    for color in colors: # Emulate breathing LEDs
        breathing_led(color)
        time.sleep(0.1) # Halt between colors
The above code uses a fairly simple algorithm to render a breathing LED routine that implies going from minimum to maximum brightness and come back to minimum brightness.
The variable led_count = 8 states that we will be using an 8-pixel WS2812 LED stick. PIN_NUM = 22 defines GP22 as the DI pin for the WS2812, and brightness is used to dim the LEDs. The state machine will be used to control the Pixel LEDs using just a single GPIO on the Rpi Pico.
This code snippet is actually a slight adaptation of a worthy work by Joshua Hrisko (Maker Portal LLC).
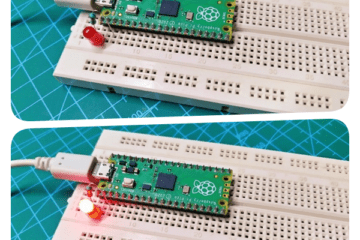
Well, here’s a tile of random snaps of my quick test setup (sorry for the poor quality images). The quick test was performed using a CJMCU WS2812-8 LED stick and a USB power bank. It’s only to make sure that the idea in the paper worked as expected. Oh, and it worked!
![]()
Finally, it is best to place your Rpi Pico Xmas Pixels Controller in a suitable waterproof acrylic box. Also, extend the LED connector cable to make installations easier. That’s all for now