How to build a USB Mug Warmer? It’s easy if you have a little skill and patience! This article will help you to build your own USB mug warmer using inexpensive components laying around your 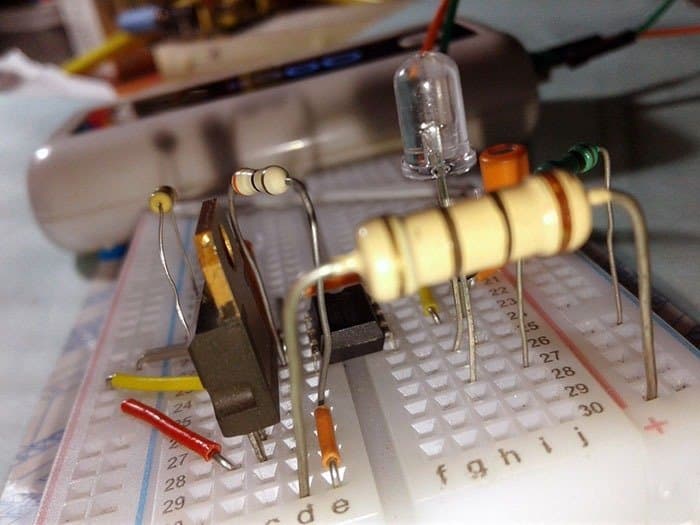 workbench. As the name indicates it’s designed with the sole purpose of being plugged into a vacant USB port on your computer/mobile phone power bank to keep a cup of tea, or coffee, at a temperature slightly higher than ambient temperature.
Key component of the mug warmer is the heater element that heats the hot plate up. The basic idea is to run two resistors in parallel as the heater element to distribute the heat better. The 22Ω x 2 resistors used here will happily run off most common USB ports (500mA @5V) delivering about 2 Watts – good enough for the proposed application. For more safety and efficacy, and to add a bit of luxury, one heater controller circuit is used in this model. Following is the circuit diagram of that pulsed heater controller based on the veritable eight-legged tiny timer chip NE555P.
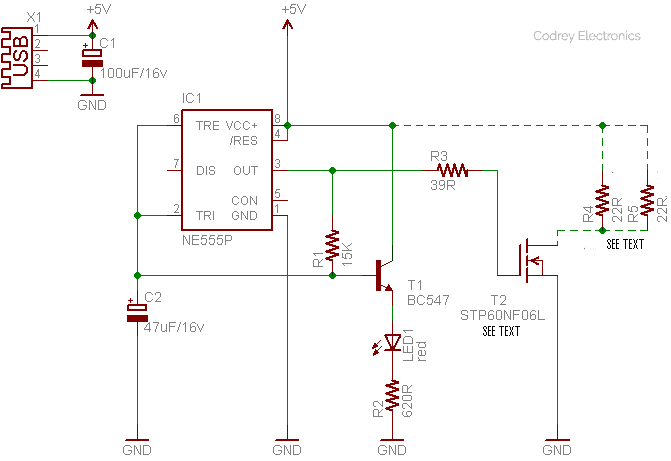
In the above schematic, IC1 is wired as a low-frequency astable multivibrator runs on 5V. RC components R1 and C2 sets the astable frequency. Transistor T1 drives a low-current red indicator LED1 that always ‘breathes’ in a charming manner. The power mosfet T2 is the driver for the heater resistors R4 and R5. As can seen in the schematic, output pulse from pin 3 of IC1 propels T2 through R3, back and forth rhythmically. The entire circuit will draw a maximum of 450mA current at 5V dc, dwells safely within the USB limit.
Initially I tested my breadboard setup successfully with a single 10Ω/2W resistor as the heater element (see next image). Later it’s tested with two 22Ω/2W (2%) MFRs connected in parallel as clearly indicated in the schematic. You can try the same 22Ω/2W (2%) MFRs because it can assure more efficacy and safety. Likewise, the power mosfet should be the type P60NF06L, or some other precise drop-in-replacement that fits well for the duty. Someone who frequently makes harsh and unfair judgments may come up against the usage of a ‘beefy’ power mosfet in this low-voltage and low-current device. That’s quite usual but I still push for it and I’ve a firm reason for that!
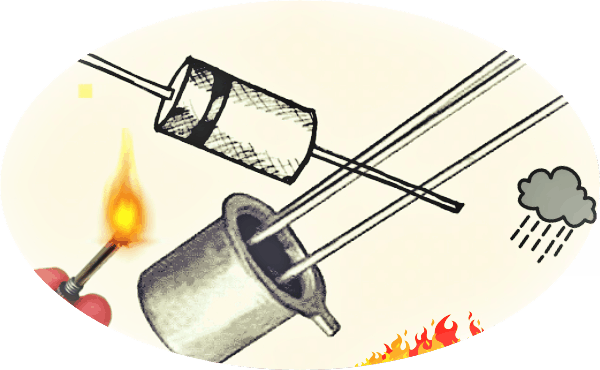
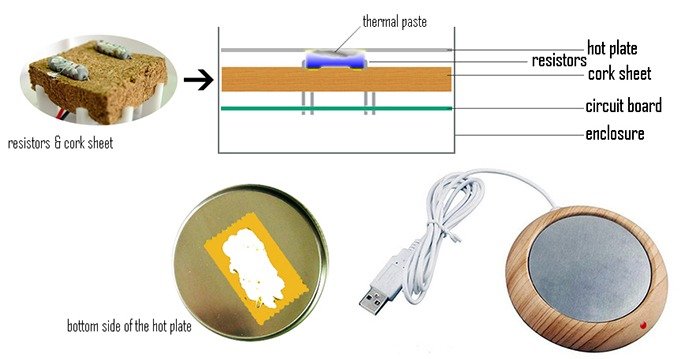
After the successful build (do solder all components neatly on a piece of perf-board except the heater resistors) and final test, enclose the finished electronics inside a suitable readymade or 3D-printed doughnut-shaped container. The enclosure must hold the circuit board, hot plate, and the heater element firmly in place. Remember to drill two holes for the USB cable to run into and for the indicator to protrude outwards. The heater element should be mounted rigidly below the hot plate (circular piece of metal) so that when it heats up, that heat transfers into the hot plate, on which the mug of tea sits. A construction pointer is also included here for your ready reference (see next drawing made with borrowed pics). The cork sheet do nothing more than holding the heater resistors tight against the bottom-centre of the hot plate. Needless to tell, a little spread of thermal paste will ensure smooth heat transfer from the heater element to the hot plate.
Hope now you get the idea right. Cheers up? Naturally, I already have some thoughts on an upgraded version. Comments and suggestions are welcome!
stopping point
Note that, I can’t be held responsible for any damage caused to the USB ports/ electronics of your computer or power bank. Around 2 watts of power is enough to keep the mug hot till the last drop of beverage. Anyway you can do your own homework to set the desired heat level, but keep in mind the 500mA limits of common USB ports.
marketplace
There’re many sources to buy requisite parts, but here’s some quick (unbiased) links: