Near Field Communication (NFC) is a unique technology for creative marketing and mobile payments. Most of the recent smart phones support NFC so you can find that there is more fun and practical stuff you can do with it. This article provides a typical application example, a little bit advanced but great for tech-savvy people. Here, you are going to build your own NFC Keyring. The NFC Keyring could send a person to your company/personal website, for example.
Build Your NFC Tag Writer/Reader
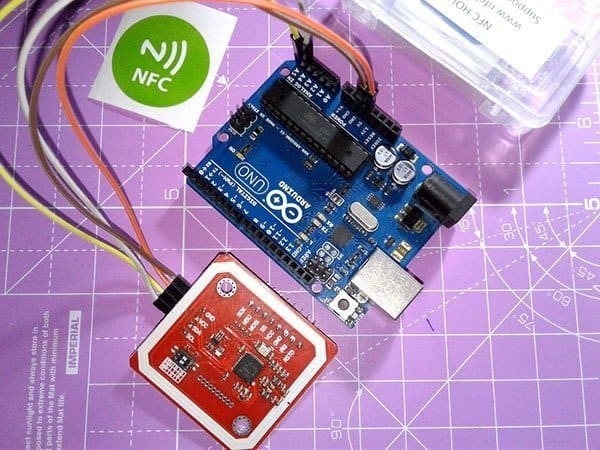
Quite naturally you will need a suitable hardware for writing (and reading) NFC tags. An easy way to build the requisite writer/reader hardware is the use of a readymade NFC module with an Arduino Uno microcontroller. And for this reason, first of all gather the following components:
- PN532 NFC/RFID Module (Elechouse Version 3)
- Arduino Uno Board (Original/Clone Revision 3)
The PN532 NFC RFID Module is a highly integrated transmission module for Near Field Communication at 13.56MHz. The compact and easy to use module supports RFID reading and writing, and NFC function with Android phone as well, which makes it quite convenient for our proposed project. See its key features listed below:
- Supports I2C, SPI and HSU (High Speed UART) interface
- Onboard mode switch for interface selection
- Onboard voltage regulator and level shifter
- Onboard antenna for effective communication (3cm maximum)
Works in the NFC mode and RFID reader/writer mode

As you can see, the PN532 module package usually comes with a set of right-angled male headers, and female-to-female jumper wires. In addition, you’ll get one Mifare Classic RFID card (white) and a Tag (blue) for your quick experiments. It’s pretty easy to modify the cute tag as an NFC Keyring with NDEF message. However, now a days you will get bundles of cheap rewritable NFC stickers from certain electronics online stores. Such NFC stickers are more effective in case you wanted to make physical business cards with NFC stickers i.e. your own NFC business cards!
Note that, NDEF messages are the basic transportation mechanism for NDEF records, with each message containing one or more NDEF Records. The NDEF format is used to store and exchange information like URIs, plain text, etc., using a commonly interpreted format. NFC tags like Mifare Classic cards can be configured as NDEF tags, and data written to them by one NFC device can be understood and accessed by any other NDEF compatible device.
Once you have all the hardwares together, you need to install the PN532 Arduino Library that will make the writing (and reading) on NFC tags possible. You have to download and install the PN532 library (https://github.com/elechouse/PN532) using Arduino’s “Add.zip Library” under Sketch >> Include Library. It’s very crucial to install all of the following folders otherwise you will have compiling errors.
- PN532
- PN532_SPI
- PN532_I2C
- PN532_HSU
- PN532_SWHSU
- NDEF
The entire hardware preparation is extremely simple. At first, configure the mode selector switch in the PN532 module for I2C interface, and keep up the interconnection as pointed in next table.

| PN532 Module | Arduino Uno |
|---|---|
| GND | GND |
| VCC | 5V |
| SDA | A4 |
| SCL | A5 |
Write/record (& read) your message
Now you can write your NFC tag, after uploading this simple sketch to Arduino Uno.
* PN532 NFC RFID Module (v3)
* NFC Tag Writer Code v1
* For Mifare Classic NFC tags only*
* Adapted example code (Thanks to NDEF Arduino Library)
* Tailored for I2C & Arduino Uno
* T.K.Hareendran/2019
* codrey.com
*/
#include <Wire.h>
#include <PN532_I2C.h>
#include <PN532.h>
#include <NfcAdapter.h>
PN532_I2C pn532_i2c(Wire);
NfcAdapter nfc = NfcAdapter(pn532_i2c);
void setup() {
Serial.begin(9600);
Serial.println("NFC Tag Writer");
nfc.begin();
}
void loop() {
Serial.println("\nPut a formatted Mifare Classic NFC tag on the reader..."); // See Notes
if (nfc.tagPresent()) {
NdefMessage message = NdefMessage();
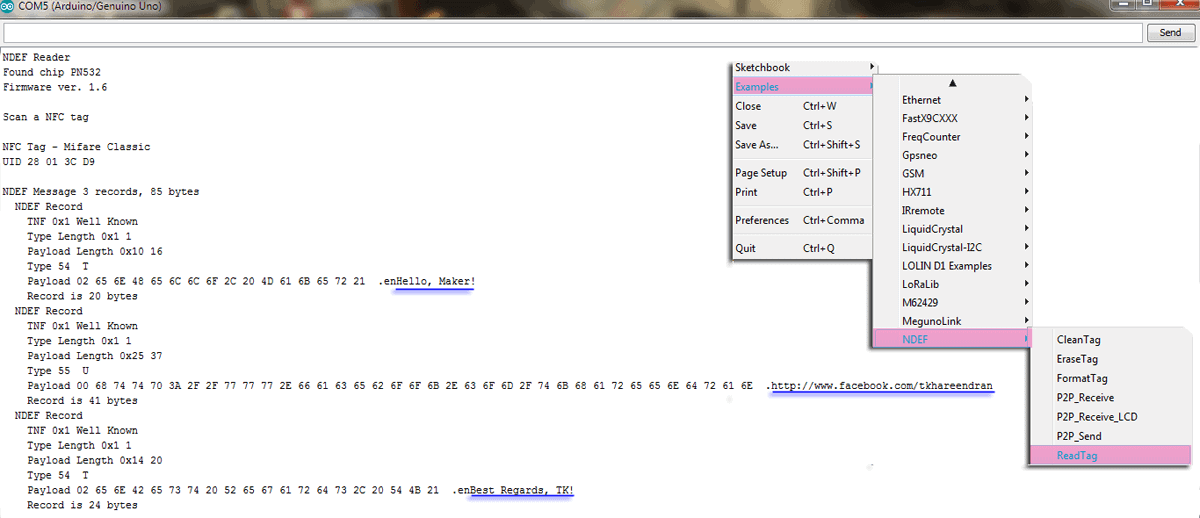
message.addTextRecord("Hello, Maker!"); // Customized Text 1
message.addUriRecord("http://www.facebook.com/tkhareendran"); // Customized Link
message.addTextRecord("Best Regards, TK!"); // Customized Text 2
boolean success = nfc.write(message);
if (success) {
Serial.println("Success. Try reading this tag with your phone!");
} else {
Serial.println("Write failed!");
}
}
delay(3000);
}
After successful upload of the writer code, you can test your NFC Keyring with an appropriate smart phone. A broad list of NFC-compatible smart phones, published by ShopNFC, is available here – www.shopnfc.com/en/content/7-nfc-compatibility. If such a model is not within your easy reach, you can still use your PN532 NFC writer hardware setup to read it. To meet that simple need, just upload the “ReadTag” example from NDEF library to your existing hardware setup, and open the Serial Monitor for reading your NFC Keyring. You will probably get an output window similar to the one shown below.
You can ofcourse upload a much simpler sketch having got just one web address (i.e. lacking any plain text message) – a pointer to your company website, for instance. Feel free to make your next sketch with great restraint. Here’s an example code snippet helpful for that simple attempt.
if (nfc.tagPresent()) {
NdefMessage message = NdefMessage();
        message.addUriRecord("https://www.codrey.com");
bool success = nfc.write(message);
        if (success) {
          Serial.println("Success! Try reading this tag with your phone!");
        } else {
          Serial.println("Write failed!");
        }
By the way, your NFC writer always expects a pre-formatted “Mifare Classic NFC Tag” and hence you should format the keyring (tag) at first with the help of “FormatTag” example provided by NDEF library. After successful formatting, you can put it on the writer for registering your customized messages (NDEF Records).
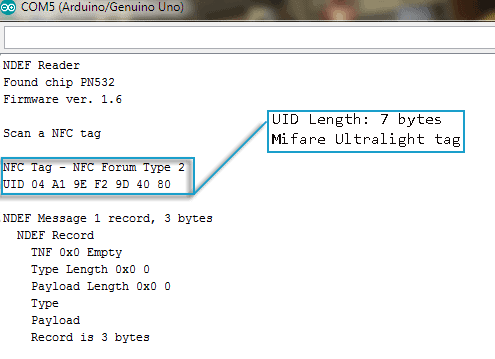
I made a bad mistake! Now I am going to admit a serious mistake attributed solely to my inattention while I was placing an order for some NFC stickers sold by Amazon. It’s clearly stated in the seller’s page that their NFC stickers are “Mifare Ultralight” tags with EV1 chip from NXP, but merely bunked from my attention. As far as I know, available Arduino NFC libraries for PN532 by Elechouse, SeeedStudio, Adafruit, etc. won’t allow the writing of NFC tags except Mifare Classic. Anyway I scanned those NFC stickers and confirmed my slip (see next image). At present it’s a futile effort …Disquieted!
For more on NFC Tags & Specs, go through www.shopnfc.com/en/content/6-nfc-tags-specs. Okay, that’s all for now. Give this project a try for yourself. Have fun working with NFC!

Hi, Thank you for sharing your knowledge. I bought a PN532 module as listed here. The dip switch is in right place. I2C mode, I tried so many different scatches. None of them recognized the reader. The wiring is correct. Arduino UNO and the reader is brand new. I am over 40 years in a pro electronic guy. What I miss ?
Haim: You’re welcome 👍 First of all, thanks for your keen interest in this post!
Now note that most PN532 Arduino libraries do not allow writing NFC tags except for “Mifare Classic”. This is another post on the same topic https://www.electroschematics.com/nfc-rfid-module-pn532/
The RC-522 module (ISO14443A protocol) seems to be a good choice in such cases as it’s comparatively simple. But if you want to support more protocols you should need PN532. Further reading – https://www.arrow.com/en/research-and-events/articles/rfid-and-nfc-types-explained
Keep questions coming…Good Luck!
Note: I tried RFID-RC522 the blue reader is works well