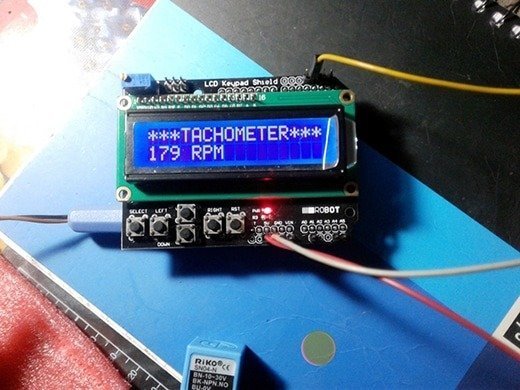
Here’s a simple Arduino Tachometer project for measuring and displaying speed of rotation. You can find similar projects everywhere on the web but this one has some unique features. First off, the idea is based on a square type inductive proximity sensor SN04-N from RiKo. The SN04-N is a low cost, stable, and waterproof inductive proximity sensor with a normally-open (N/O) NPN transistor output, surprisingly with an internal pull-up resistor that’s not clearly mentioned in the datasheet!
Hardware: This project requires three key hardware parts as listed below.
- Inductive Proximity Sensor (SN04-N)
- Arduino (Rev3)
- Arduino LCD Shield (DFR0009)
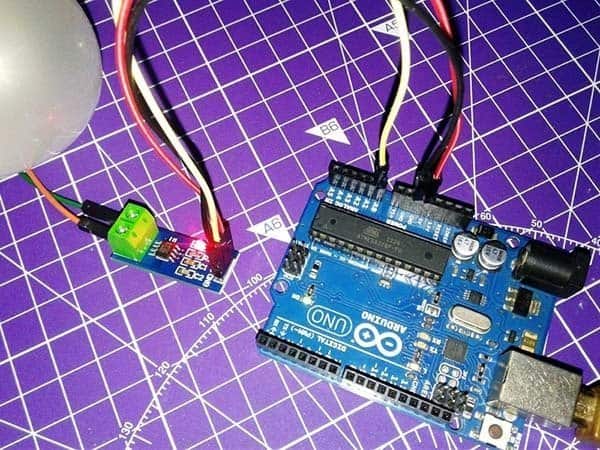
As can see in the below diagram, the hardware frame-up is extremely simple, and calls only one bare I/O of Arduino (Pin 2) to complete the entire setup. Pin 2 of Arduino Uno, used here as the ‘Pulse Input’ pin, is its ‘Interrupt 0’ pin that enables us to run some code only when a level change happens there. The second interrupt – ‘Interrupt 1’ of Uno is on Pin 3. Just to recap, interrupts are a nice way to make the system more tractable to time tender tasks. They also helps to free up the main loop to look at the primary task in the system. For more details, check out this documentation on interrupts – https://www.arduino.cc/en/Reference/attachInterrupt

Software
The code strictly follows the common Arduino Sketch style and uses the standard interrupt 0 on pin 2 (D2). As you can see in the code, the interrupt triggers on ‘falling’ edge of the input pulse. Copy the below code in your Arduino IDE software to program your Arduino.
/*
 * Arduino Tachometer (for beginners)
 * uC Hardware: Arduino Uno R3 & DFR0009 LCD Shield
 * Sensor: SN04-N Inductive Proximity Sensor
 * Prepared & Tested by T.K.Hareendran
 * Publisher: Codrey Electronics
 */

 #include <LiquidCrystal.h>

LiquidCrystal lcd(8, 9, 4, 5, 6, 7); // Pins assigned for DFR0009

volatile uint32_t rev; // Revolution Count
unsigned long measureTime = 0;

void setup() {
  pinMode(2, INPUT); // Interrupt 0
 // pinMode(2, INPUT_PULLUP); // Internal Pull Up*


  lcd.begin(16, 2);
  lcd.print("***TACHOMETER***");
  delay(500);

  attachInterrupt(0, addRevolution, FALLING);
}

void addRevolution() {
  rev++;
}

void loop() {
  delay(1000);

  noInterrupts();
  uint32_t rpm = rev * 60000 / (millis() - measureTime);
  rev = 0;
  measureTime = millis();
  interrupts();

  lcd.setCursor(0, 1);
  lcd.print(rpm);
  lcd.print(" RPM        ");
}
In the code, the interrupt will increment a variable each time the signal at INT0 is falling, and interrupts are disabled during the computation time. Take note on the code line ” uint32_t rpm = rev * 60000 / (millis() – measureTime);” as it’s tailored for interrupts occurred once per revolution. You can modify this line to suit your specific ‘sensor and target’ setup. The given code works better only if the RPM is greater than 60 as at least one rotation per second must happen for accurate RPM display.
Rotational Speed Monitor
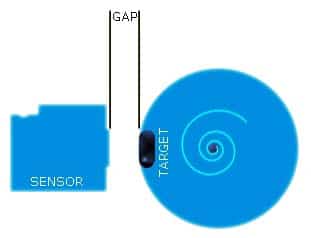
As stated, an inductive proximity sensor is used for rotational speed monitoring here by counting relevant pulses in a non-contact way. Sensing range of SN04-N is 4mm but a distance (gap) close to 3.2mm is recommended between the stationary head (proximity sensor) and the orbiting target (ferrous object).
The entire setup must be powered from a regulated 5V dc supply. First of all, route the ground lead of the power supply to the ground rail (GND) of Arduino, and to the ground wire (blue) of SN04-N. Similarly extend the positive lead to the regulated dc input (5V) pin of Arduino, and to the positive wire (brown) of SN04-N. Finally, connect the output (black) of SN04-N to D2 (INT0) of Arduino (refer next figure). For short-time experiments, powering up the Arduino through its dc input jack (or Vin) by a 9-12V unregulated dc supply lets you take the regulated 5V output from Arduino board to run the inductive proximity sensor (be careful).

According to “Automation Insights” blog (https://automation-insights.blog), the best target in general for an inductive proximity sensor is a flat piece of ferrous metal. Other non-ferrous target materials can still be detected by an inductive sensor (of course with lesser sensitivity), but ferrous steel is a proven target material with a cheerful sensing range.
Don’t Kill Your Arduino! Somebody might wonder why I wanted to run SN04-N sensor from a 5V regulated dc supply instead of the recommended 10-30V dc input. It’s because I noticed that output (black) of the SN04-N sensor (what I got from an online seller is a cheap one, may be another clone) is internally tied to its unregulated positive rail through a 10K pull-up resistor. So its output will give the same inputted positive voltage in idle state and that will kill the Arduino. Although with a little trick it’s easy to drop down the output voltage to TTL level, my laziness forced me to try a 5V regulated dc supply input for SN04-N, and it worked.
More Interrupts?
If you want one more sensor in the same setup, luckily Arduino Uno has 2 external interrupts, so you can try the same strategy as in the code, i.e. just make another interrupt function for the second sensor and attach it on interrupt 1 (pin 3). Thankfully, using the “PinChange Interrupt” library, we can configure any pin on Arduino an interrupt pin. As always you can go through the external link for more details https://www.brainy-bits.com/make-any-arduino-pin-an-interrupt-pin/
And, here’s a useful documentation especially for those interested to learn more about Arduino RPM measurement techniques http://elimelecsarduinoprojects.blogspot.com/2013/06/measure-rpms-arduino.html
wonderful! is it possible to incorporate the s/w into another prog that uses I2C LCD .. it displays x & y & speed of a pc less cnc (electronoobs cnc)?
Qtron,
Just for your quick reference: See last segment of this page (https://forum.arduino.cc/index.php?topic=200905.0) to get an adaptable code. Thanks!
thanks 4 Rapid reply TK!!