Artificial fire lamps nowadays are quite easy to buy. Usually, such a fire lamp has a special inbuilt flickering light-emitting diode to create the fire/flame effect. Anyway, I don’t want to buy cheap 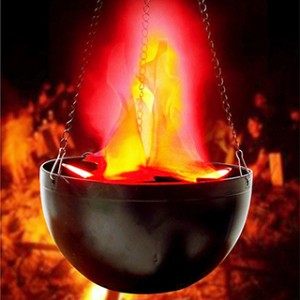 and possibly counterfeit Chinese artificial fire lamps because it’s damn easy to simulate a very naturalistic fire/flame effect using ordinary light-emitting diodes. This time I’ll show you how to make a pretty cool artificial fire lamp using one microcontroller and little code trickery!
fire/flame simulation
Honestly, this little hobby electronics project has been on my mind for a few weeks now. The theme, at last, got me to pick an Arduino microcontroller board and a couple of common 5mm LEDs to make it at ease. Okay, let’s get down to build now.
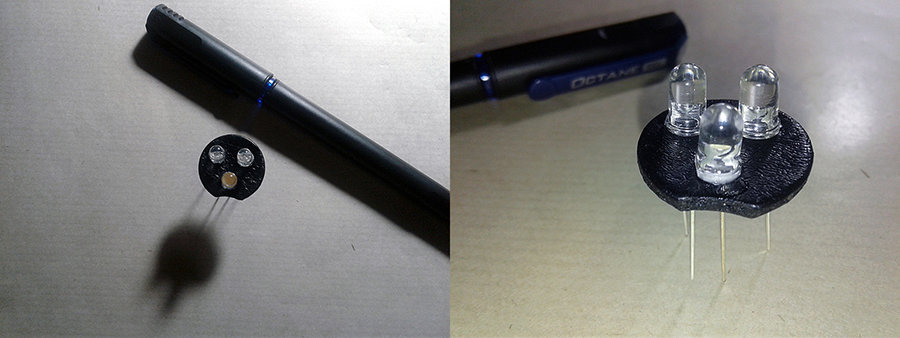
The concept is simple as the ‘flame-head’ is a combination of one warm white and two red LEDs with a flickering effect imitating a flame. The requisite flickering effect can be created with the Arduino handling the LEDs. The drive for each LED is dictated randomly by a funny Arduino Sketch (see it later in this page). Note that the three LEDs are wired to the PWM pins (D9-D10-D11) of the Arduino board, and there’re three 270Ω current limiting resistors (R1-R2-R3) in-between.
| Arduino | LED |
|---|---|
| D9 → R1→ | Red |
| D10 → R2 → | Red |
| D11 → R3 → | Warm White |
Note that the blend of red and warm white LEDs is important here to render a realistic flame effect, however, you can try any colors you want. Moreover, in order to get a realistic candle flame effect you can try another setup (of course with a revised code) comprises one red and two yellow LEDs in which 66% of the light is yellow and the rest 33% of the light is red – just like a real candle flame where most of the light is yellow. This is my LED Flame Head!
Now to the Arduino Sketch (code):
int flameLED1 = 9;
 int flameLED2 = 10;
 int flameLED3 = 11;

 void setup() {
 pinMode(flameLED1, OUTPUT);
 pinMode(flameLED2, OUTPUT);
 pinMode(flameLED3, OUTPUT);
 }

void loop() {
 flame();
 }

void flame() {
 analogWrite(flameLED1, random(10, 255));
 delay(20);
 analogWrite(flameLED2, random(10, 255));
 delay(20);
 analogWrite(flameLED3, random(10, 255));
 delay(20);
 }
This is not entirely my own Arduino Sketch, and it might not be the most perfect way but it works and looks decent. Feel free to ask any question about the code in the comments below.
Following is a sparingly retooled code for the same (previous) hardware setup. Nevertheless, the final pick is yours!
int LED1 = 9;
int LED2 = 10;
int LED3 = 11;
void setup() {
pinMode(LED1, OUTPUT);
pinMode(LED2, OUTPUT);
pinMode(LED3, OUTPUT);
}
void loop() {
int L1, L2, L3;
L1 = random(155) + 100;
L2 = random(155) + 100;
L3 = random(155) + 100;
analogWrite(LED1, 255 - L1);
analogWrite(LED2, 255 - L2);
analogWrite(LED3, 255 - L3);
delay(20 + random(80));
}
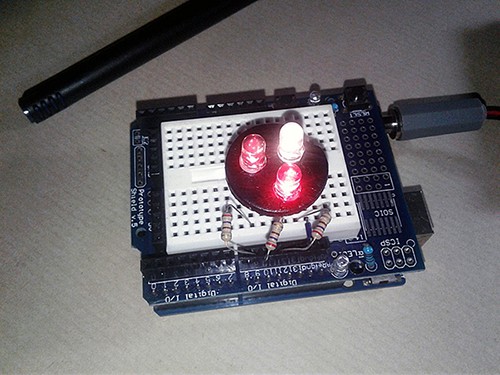
As you can see in the lab snaps provided below, I made my prototype with an Arduino Uno and its prototyping shield. I’ve to say that I am very satisfied with the final result. Keep in mind that in reality, it’s very realistic and more beauteous than filmed one (watch my quick test movie).
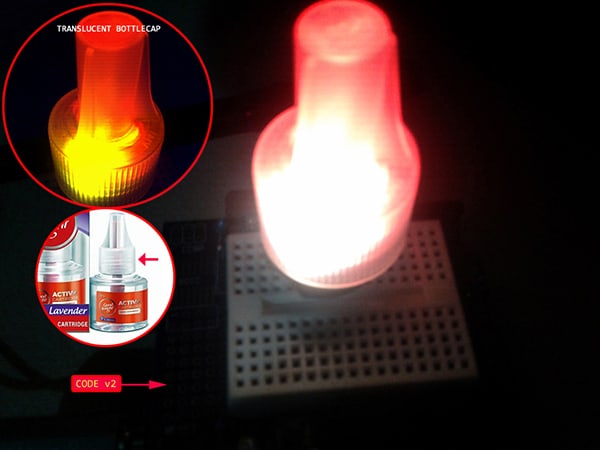
As you can see below, I finally mounted a translucent bottle cap over the LED flame head to make it more pretty (but not so extraordinarily handsome, admitted).

hole-in-corner
The real intention behind this idea is to try out common LEDs and/or special LED display panels to simulate flame/fire effects in Farm Fences! Even on hobby farms, fencings play an important role in confining and defending animals and crop areas. A ‘fire pole’ fence can distract predators and is not particularly dangerous when compared with the common electric fence. Although we still have a lot to learn about how wildlife detects and responds to fire, it’s observed that most animals avoid fire by natural instinct. We all knew campfires will usually repel visits from most wild animals.
Moreover, it’s worthy to notice that some authentic experiments have shown smoke awakens many animals, and most can recognize the distinct sounds of fire as well. Surprisingly, some other species can also sense infrared radiation from fires. Anyway, my crazy scheme can only render a realistic visual effect – no dense smoke and no infrared radiation (there must be an icy fire, however)!
let’s tweak it
The next thought in line is the practical application of special LEDs in place of the usual LEDs. In order to create a better fire/flame effect, it is absolutely necessary that you both simulate the colors and the flickering. Moreover, you will need the light to be flickering and fading up and down randomly. Arduino can of course manage LEDs in various modes using its inbuilt PWM pins – what we need is a much realistic fame simulation through proper LED components.
For practical reasons, I’m planning to employ Neopixel LED modules and LED dot matrix displays to create pretty good illusions of real flames flicking in the wind. My first experiments with a Neopixel LED Ring (WS2812B) looked promising, and great too!
Neopixel LED projects are usually quite easy to construct, and using minimal hardware you can create really fun effects. The Neopixel LED project proposed here is also simple as you can look up some related do it yourself projects already published here. Anyway, here you need to know the optimal RGB values of fire, for example, the156,42,0 and 255,153,0 values represent shades of orange color from which you can build your color of fire.
In an upcoming post, you can see how to create a fantastic fire/flame simulator with auto sleep function using Neopixel LEDs and Arduino. So stay in the loop!
![]()
Credits & References
- Tall Timbers Research Station, Florida
- heidislab.com
- https://www.abc.net.au
- https://survivalfreedom.com
- https://www.thespruce.com