Arduino is certainly a great microcontroller platform for STEM kids as it provides a wide range of learning opportunities for both students and teachers. So, this post is all about making your own smart night-light using a handful of cheap and easily available electronics components and an Arduino microcontroller. Well, let us take a look at it now.
Hardware
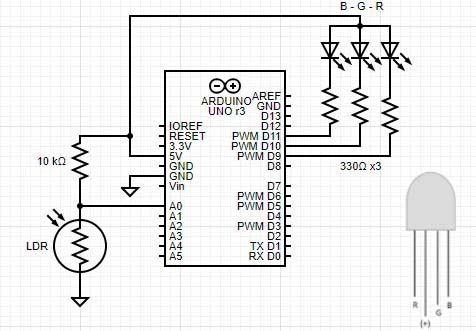
Here is the list of parts needed to set up the night-light hardware:
- Arduino Uno Microcontroller Board x1
- 10mm Common-Anode RGB LED x1
- 5mm Photoresistor (GL5516 LDR) x1
- 10KΩ ¼ W Resistor x1
- 330Ω ¼ W Resistor x3
- 6F22 9V Battery x1
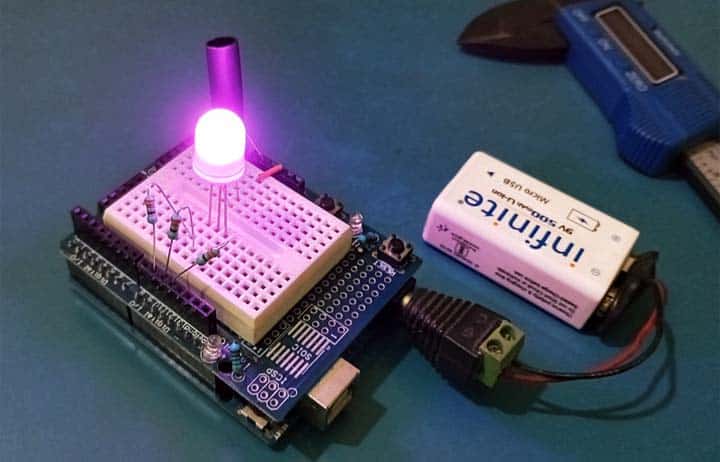
Now see the hardware setup diagram below.
One amazing thing about this night-light is that it has a “self-calibration” feature. That is, each time you move your night-light into a new room or lighting situation, you can recalibrate it by pressing the Arduino’s reset button. Now the night-light should turn on with a purple colour and remains lit until the photoresistor is exposed to more light i.e. when the surroundings get brighter.
a ‘pre_level’ and ‘cur_level’ global variables without assigning value to them. The code takes a single initial calibration reading from the photoresistor and stores it in the pre_level variable. This is the value the code will compare future measured light levels against to decide whether to turn the lamp on or off.
Next, the loop function repeatedly scans the current light level and stores it in the cur_level variable. The value of cur_level will be updated every time the loop function repeats.
Note that everytime you hit the reset button (or in case of a power cycling), the calibration value for the night-light will be readapted. So, make sure that the photoresistor is reading the actual light level of the room at that time and you are not accidentally shading it in any way.
Software
Below is the well-commented Sketch for the Adaptive Arduino Night-Light project.
int pre_level; //Preset Light Value
int cur_level; //Present Light Value

void setup()
{
  pinMode(9, OUTPUT); //Red LED
  pinMode(10, OUTPUT); //Green LED
  pinMode(11, OUTPUT); //Blue LED
  pre_level = analogRead(A0);
}

void loop()
{
  cur_level = analogRead(A0); //Read Photoresistor
  if (cur_level > pre_level) //Render Purple Output
  {
    digitalWrite(9, LOW); //R = ON
    digitalWrite(10, HIGH); //G = OFF
    digitalWrite(11, LOW); //B = ON
  }
  else
  {
    digitalWrite(11, HIGH); //R-G-B OFF
    digitalWrite(10, HIGH);
    digitalWrite(9, HIGH);
  }
}
Mix Well
Also, you are not throttled to the default purple light you have seen so far as an RGB LED is used here deliberately, that is, by mixing the primary colors you can create countless combinations and delighting colors.
To use the RGB LED in such a way, however, you need to use analog values rather than digital values as shown in the below sample code snippet (to insert inside the loop).
{
  cur_level = analogRead(A0);
  if (cur_level > pre_level)
  {
    analogWrite(9, 255); //Cadmium Yellow
    analogWrite(10, 246);
    analogWrite(11, 0);
  }
  else
  {
    analogWrite(11, 255); //OFF
    analogWrite(10, 255);
    analogWrite(9, 255);
  }
}
Going Further
This little project employs a bunch of regular components but it still has a load of potential for further tinkering. There are plenty of things you can do in terms of both the hardware and the software as you build your skills with Arduino.
So, try to explore all possibilities to make it more lovely. The final design is totally up to you but you can create a whole new design if you desire. For some helpful hints, look back at the Arduino projects previously published here. Keep Experimenting…
Explore a wide range of Embedded IC Chips at Ampheo Electronics, offering accurate and comprehensive options. Request quotes effortlessly!