Xmas star is more than just a lovely ornament. The Xmas star is also known as the star of Bethlehem and is a major seasonal symbol throughout the globe. Well, Christmas is just around the corner, so let’s make a USB-Powered Breathing LED Xmas star!
Get ready to do it this time with a Raspberry Pi Pico microcontroller. With a powerful microcontroller at its core, you can enhance the design at any time by tweaking the code merged into it. Let’s get started…

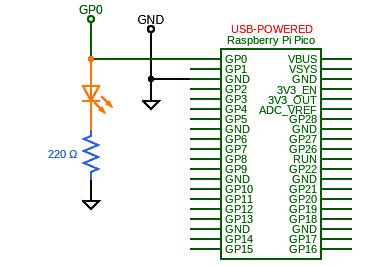
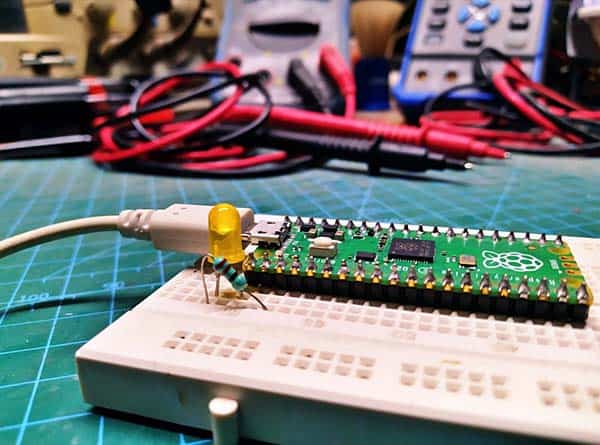
Below is the excellently simple and straightforward basic schematic of the project. First, test your prototype with a standard LED. I used a 5mm amber LED to do that.
At that time my power source was a USB travel charger (5V/2A).
As you can see, the LED is wired to the first GPIO pin (GP0) and routed to the Pico GND via a 220Ω ¼ W current limiting resistor. Actually, we have 8 GND pins, from where the physical ground can be connected. Also note that the GPIO pin puts out 3.3V maximum (Raspberry Pi Pico’s GPIO is powered from the onboard 3.3V rail and is therefore fixed at 3.3V).
The code given below slowly fades the GP0 LED on and off. So, the outcome is a nice pattern of bright and dim that pulses over and over. The pulsing fading effect ramps up and down with a short off period. This effect is also known as the breathing LED or the Apple LED. For a faster/slower breathing effect, you can experiment with my canonical code.
volatile float star_breath;
void star_fadeoff();
void star_fadeon();

void setup() {
}

void loop() {
  star_fadeoff();
  star_fadeon();
}

void star_fadeoff() {
  star_breath = 255;
  while (!(star_breath <= 0)) {
    analogWrite(0, star_breath);
    delay(25);
    star_breath -= 5;
  }

}
void star_fadeon() {
  star_breath = 0;
  while (!(star_breath >= 255)) {
    analogWrite(0, star_breath);
    delay(25);
    star_breath += 5;
  }
}
Regular visitors to this site may not be surprised to see the above code written in the quite familiar Arduino format, because they know that Raspberry Pi Pico can also be programmed via Arduino IDE. Yes, you can now use your Raspberry Pi Pico board like an Arduino microcontroller board and program it with the Arduino IDE. Those who don’t know about it can go through this recent tutorial https://www.codrey.com/raspberry-pi/raspberry-pi-pico-arduino-ide/

Now you have an idea to make breathing Christmas stars. But a single LED is not enough for a fancy Christmas star. So, you can add more LEDs as needed, but be prepared to build a power driver circuit to drive the GPIO pin as well (see below).
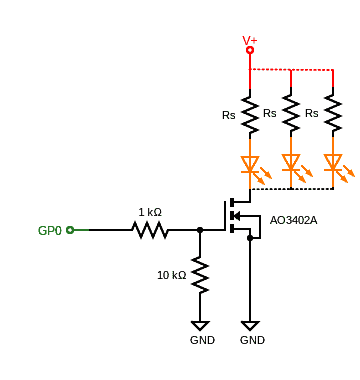
- AO3402A MOSFET – https://www.sunrom.com/p/ao3402-a29t-sot23-n-ch-mosfet
Finally, mechanical guidelines for constructing the frame of the star are not included in this quick writeup. Hopefully you have an artistic mind to move on. HAPPY CHRISTMAS ✨