While I was browsing the listing of art and craft materials on Amazon, I chanced upon acrylic sheets but I didn’t consider much of it. In fact, given a great discount offer to buy a bundle, I got over it twice or thrice. It was only when I started needing them to make a couple of artistic LED display projects I decided to go for the offer and buy a bunch of 3×3 inch/3mm clear acrylic sheets.
Acrylic Art & Decor
Acrylic is a transparent plastic material with outstanding optical clarity. Acrylic, often referred to as Plexiglas or Perspex, has many uses in commercial and residential settings – from durable signs and skylights, to eye-catching retail store displays. Further, clear acrylic plastic, that exhibits glass-like qualities, transmits light better than regular glass. In fact over 92% of light goes through a clear sheet of acrylic plastic, and this opens the door for unlimited creative potential (the transparency and clarity of acrylic lend well to the display of decorative paintings and photos). And, acrylic sheet is easy to fabricate, bonds well with many adhesives and solvents, and is easy to thermoform.
Edge-Lit Acrylic Display
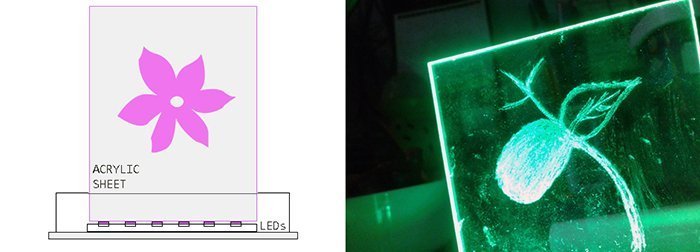
Edge lighting is a pretty nifty idea. If you shine a light source through the acrylic sheet, it just goes straight through, but if you engrave a specific pattern, naturally it will refract the light, and making that pattern visible.
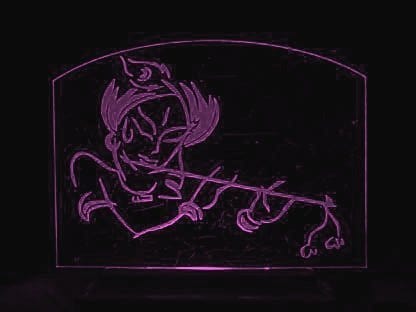
Edge-lit acrylic displays of all sorts have been an interest of mine. They become interesting when you start to discover the huge variety of applications they are used for. While doing research for some funny ideas about cute LED night lamps, I came across a couple of diversities of what appear to be a edge-lit acrylic night lamp for bedrooms. However, during my travels I came about another feasible idea for making a beautiful edge-lit acrylic sign without burning holes in my pocket.
The Quick Assembly
My quick idea is to devise an appropriate enclosure with decent room to accommodate necessary bits of electronics. And of course a slot in its top lid to hold the acrylic sheet up so that I can cut new pieces of acrylic and just drop them in. While it’s a bit hard to explain the entire construction process, you can see the idea in the drawing below. Note that the light source gets attached to the bottom lid of the enclosure.
While designing/making your enclosure, it’s a good idea to leave more room on the sides so that you can mount the rest of the electronics (including power switch and power connector) there. You should need to keep an eye on the existent measurements depending on the size of your acrylic sign and the light source/strip.
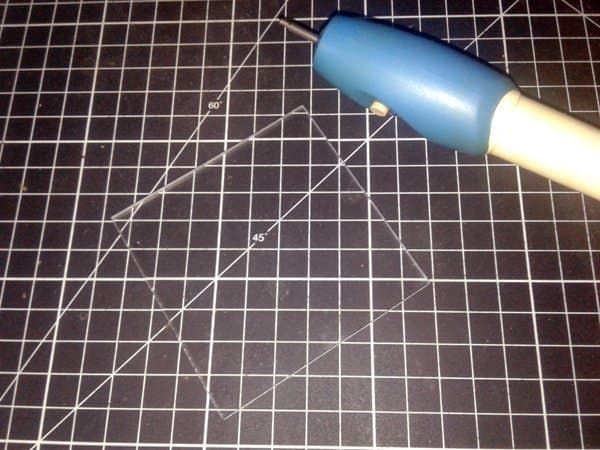
Aboveboard, I’m learning acrylic art bit by bit, but the sad news is that I don’t have access to a 3D printer or laser engraver as yet. So, for creating signs on my acrylic sheets, I’m using a small, battery-powered, engraving pen once I bought from an eBay seller. When playing with acrylic, you must be very careful not to scratch it, because every little scratch will show up when the sign is lit. Needless to say, you can also use your 3D printer to ‘print’ the enclosure and some acrylic signs.
Before beginning to experiment with acrylic in your laser, it’s important to understand useful tips on how to laser cut and laser engrave acrylic sheets. See a few handpicked reference links:
- https://www.ulsinc.com/materials/acrylic
- https://www.engraversjournal.com/legacyarticles/2835/
- https://www.pmma.dk/Acryl_stobt_kontra_ekstruderet.aspx?Lang=en-GB
- https://www.epiloglaser.com/how-it-works/applications/laser-cutting-acrylic/
- https://photograv.com/wp-content/uploads/2019/02/engraving_on_acrylic.pdf
Arduino/Digispark LED
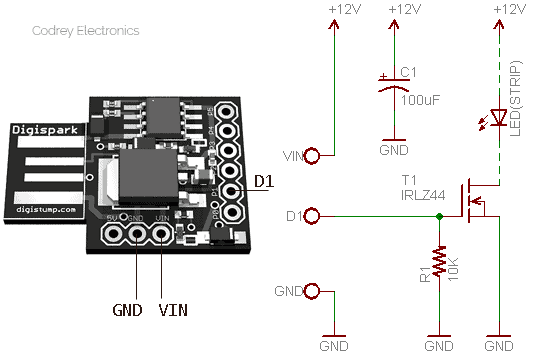
This time my pick is the Digispark Attiny85 development board as the ‘workhorse’ that can be programmed over USB. The fairly clever approach lets me tweak the setup later using different codes I can find/write but without changing the basic hardware (might be right for any tinkerer).
Yep. It’s time! Go to your Arduino IDE, open it, and upload the following code to your Digispark microcontroller board. If you’re new to all this, I recommended checking out the basic Digispark & Arduino tutorials posted elsewhere in this website.
int ledSign = 1; // LED drive output = P1

// int ledSign = 0; // LED drive output = P0 / Choose either one!


void setup() {

  pinMode(ledSign, OUTPUT);

}

void loop() {
  breathe();

}

void breathe() {

  for (int i = 50; i <= 255; i++) {
    analogWrite(ledSign, i);
    delay(10);
  }

  for (int i = 255; i > 50; i--) {
    analogWrite(ledSign, i);
    delay(10);

  }
}
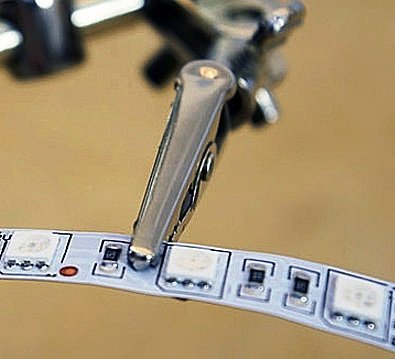
The Arduino sketch to animate the light source (LEDs) is pretty simple. The function “breathe” in this code makes what the name suggests, slowly increasing and decreasing intensity of the light source to create a breathing lamp effect. Since the LED driver circuit is prepared to control 12VDC LED strips, simply cut required piece of the 12VDC LED strip on its predetermined cutting points, then solder wires onto the LED strip appropriately. Nevertheless, the LED strip should give a strong light, which is exactly what you need.
Now you can finally finish the hardware setup. Connect the LED driver circuit (see below) to pin P1, VIN and GND on the Digispark board (An external 12VDC power source is needed). After making the connections aright, you should be able to mount the build inside the enclosure to complete the build of your standalone acrylic LED sign/decoration you need.
Acrylic & Photo Engrave
Nowadays, attaining a quality engraving of a photo on acrylic is not very difficult as there’re so many proper software packages, like the PhotoGrav, to create vibrant and dramatic images. Anyway, ensure that you purchase the “cast” type of acrylic, and engrave the image on the back side of the acrylic sheet. Attention, acrylic plastic usually comes in cast and extruded forms. If you’re doing something similar, then go for the cast type acrylic! More about PhotoGrav https://photograv.com.

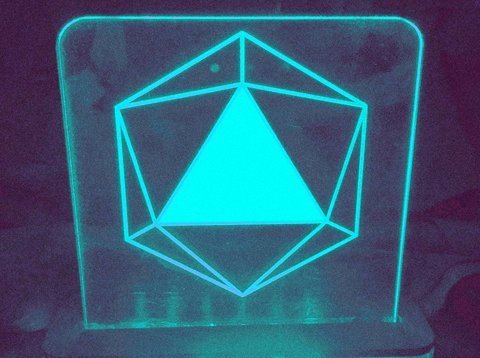
This is my first model. Sadly, the beauteous effect is not so well to see in this photograph.
Lastly, remember that this simple tutorial is empathized only as a proposition, especially the design of course is always in the eye of the beholder!