Light plays a major role in the medical field, being needed to provide faithful renderings of the observed facts. Nowadays, a broad range of examination lamps (also called as observation lamps) are available for almost all fields of medicine. Since appropriate lighting makes comfortable conditions (and boosts productivity), the quality of artificial lighting is of key importance which is directly symmetrical to the quality of the service to be provided. This article won’t help you to build a ‘medical-standard’ examination light but simply guides you through the process of building a universal external digital light controller switch for examination lamps.
There’s a good reason to go on
Before a few weeks, I was called for the repair work of a typical examination lamp used in a clinical laboratory near to me. The lamp head mounted on a flexible arm consists of a heat absorption glass and one 12V/50W halogen bulb with a cold mirror reflector to minimize heat emission and maximize cold light illumination. The flexible arm also has an on/off dimmer switch box to control the lamp head. Fortunately, the fault was because of the blew out halogen bulb but the lab technician recounted that its switch box is failure-prone, so often it leads to a dearly-won replacement. Quite naturally, I got the spark in a flash and start thinking about the design of a digital dimmer switch as the drop-in-replacement.
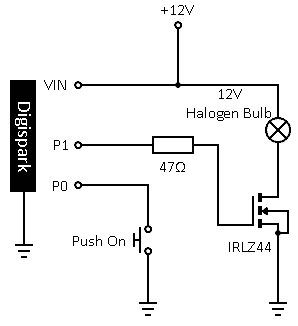
Get off the ground with a soft touch switch idea
Following is a couple of soft-touch switch ideas centered around one Digispark Attiny85 development board and a Power Mosfet. When you press the button switch in the circuit momentarily, the halogen lamp starts from zero brightness and reaches its full brightness within a moment. The smooth action will be reversed when you press the button switch for the second time. The code given below is not only suitable for the Digispark board but also right for a bare Attiny85 microcontroller (see relevant tutorials published elsewhere in this website).
/*
 *Digital Switch for Examination Lamp (v1.0)
 *Key Hardware – Digispark Attiny85 Development Board & Power Mosfet
 *Author – T.K.Hareendran/2019
 *Publisher – https://www.Codrey.com
*/

const int buttonPin = 0; // P0 as button input
const int lampPin = 1; // P1 as lamp drive output
const int fadingDelay = 60; // Smoothness

int buttonState = 0;
boolean fadingState = false;

void setup() {

  pinMode(lampPin, OUTPUT); // Lamp Pin as O/P
  pinMode(buttonPin, INPUT); // Button Pin as I/P
  digitalWrite(buttonPin, HIGH); // Enable Internal Pull-up of P0
}

void loop() {

  buttonState = digitalRead(buttonPin);


  if (buttonState == LOW) {

    if (fadingState == false) {

      for (int i = 0; i <= 255; i += 5) {
        analogWrite(lampPin, i);
        delay(fadingDelay);
      }
    } else {

      for (int i = 255; i >= 0; i -= 5) {
        analogWrite(lampPin, i);
        delay(fadingDelay);
      }
    }
    fadingState = !fadingState;
  }
}
Now see another code for the same hardware setup. Here, if you press & hold the button switch, then the halogen lamp lights up to its full brightness level smoothly and stays there until you release the button switch. When the button switch is released, the halogen lamp will return back to zero light level but again in a smooth manner.
 /*Digital Switch for Examination Lamp (v2.0)
 *Key Hardware – Digispark Attiny85 Development Board & Power Mosfet
 *Author – T.K.Hareendran/2019
 *Publisher – https://www.Codrey.com
*/

int brightness;

void setup() {
  pinMode(1, OUTPUT);
  pinMode(0, INPUT_PULLUP);
}

void loop() {
  brightness = constrain(brightness, 0, 255);

  analogWrite(1, brightness);
  delay(6);

  if (digitalRead(0) == LOW) {
    brightness = brightness + 1;
  }
  else {
    brightness = brightness - 1;
  }
}
And the third code for the same hardware setup.
 /*Digital Switch for Examination Lamp (v3.0)
 *Key Hardware – Digispark Attiny85 Development Board & Power Mosfet
 *Author – T.K.Hareendran/2019
 *Publisher – https://www.Codrey.com
*/

const int switchPin = 0;
const int lightPin = 1;
int lightMode = 1;
void setup()
{
    pinMode(lightPin, OUTPUT);
    pinMode(switchPin, INPUT);
    digitalWrite(switchPin, HIGH);
}
void loop()
{
    if (digitalRead(switchPin) ==LOW)
    {
        lightMode = lightMode + 1;
        if (lightMode == 5)
        {
            lightMode = 1;
        }
    }
    if (lightMode == 1)
    {
        digitalWrite(lightPin, LOW);
    }
    else if (lightMode == 2)
    {
        analogWrite(lightPin, 64);
    }
    else if (lightMode == 3)
    {
        analogWrite(lightPin, 128);
    }
    else
    {
        digitalWrite(lightPin, HIGH);
    }
    delay(500);
}
This code lets you switch the lamp between off, dim, medium, and full brightness. If you hold down the button switch, however, it cycles between the preconfigured brightness levels endlessly.
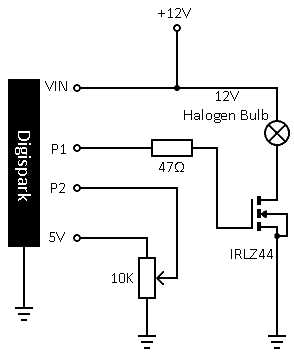
Get it on with a rotary dial
/*
 *Digital Regulator for Examination Lamp (v1.0)
 *Key Hardware – Digispark Attiny85 Development Board & Power Mosfet
 *Author – T.K.Hareendran/2019
 *Publisher – https://www.Codrey.com
*/

int lightPin= 1;
int readValue;
int writeValue; //
void setup() {
 pinMode(lightPin, OUTPUT); // Set P1 as O/P
  }
void loop() {
 readValue = analogRead(1);  //Read P2
 writeValue = (255./1023.) * readValue;
analogWrite(lightPin, writeValue);
}
This little piece of code is to regulate the lamp brightness with a potentiometer from almost 0% to 100%. The hardware configuration is very similar to the previous one but with a few minor changes. See its schematic shown below.
Be prepared for unforeseen contexts
When the code is up and running, if it reacts significantly to shifts on the potentiometer you’re going to have a tough time. Probably, the reason for the anomaly is that tiny inevitable changes in the voltage from noise will bump it back and forth between multiple digital values. In order to reduce the impact of such undesired noisy measurements, you can try implementing a software low-pass filter. Feel free to try out a couple of solutions in line to cope with, including some of the long-familiar moving average algorithms!
How to handle & care for halogen bulbs in your prototypes
Keep note, a common cause of early failure for halogen bulbs is surface contamination, and the most likely source of contamination comes from touching the glass portion of the bulb with bare skin. So, never touch it with bare skin; use tissue or cotton gloves. If the bulb is touched accidentally, it should be wiped clean with a cloth moistened in alcohol to remove potential skin oil deposits. You should also remember that the halogen bulb will be very hot and could burn your fingers. Always allow sufficient cooling time and use a cloth or a suitable heat insulator to hold the bulb. Further, sudden high-voltage surges can blow halogen bulbs, especially when cold.
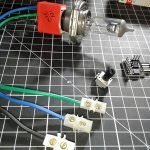
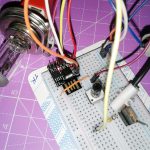
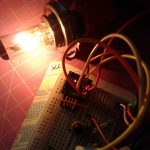
And, a couple of random snaps from my workbench, captured while I was experimenting with an Osram 12V/35W (x2) halogen bulb.

Addendum: Original part number of the Halogen bulb used here is:
“HS1 | 12V , 35/35W, Osram Classic”.