As promised, here is another fun BBC micro:bit project for your lovely kids. This time, get ready to make a dark-activated LED badge for them and enjoy!
By now hopefully you have already gone through the previous micro:bit post. Otherwise, take some time to look it up first Smart Badge for Smart Kids – micro:bit fun.
The BBC micro:bit Flashing LED Badge is a great idea for party, concert or night jogging or any other activities. Bicyclists could also clip them onto their backpacks or clothes whilst riding at night time to give them extra safety. The simple but expansible electronic badge design can easily be powered by a single 3V battery pack or thru a small USB power bank (https://support.microbit.org/support/solutions/articles/19000013982).
What is more interesting is that the only hardware required here is the BBC micro:bit board! Anyway, note at this point that although the BBC micro:bit is available in several versions, they are all suitable for this little electronic badge project. So, choose the one that is easily accessible to you. As an aside, I used a bit old BBC micro:bit V1 Go Bundle Kit for my experiments because that is what I had with me at the time.
First off, simply download the verified hex code via the link shown below. The given code was prepared using the “MakeCode editor” (https://makecode.microbit.org/).
https://www.codrey.com/wp-content/uploads/2023/07/Flashing-Badge-Hex-Code-v1.zip
Then plug your micro:bit into the computer’s USB socket, and make sure that it appears on the computer like a USB memory stick called MICROBIT.
In the end, drag and drop the downloaded hex file on to the MICROBIT drive. Look, your micro:bit will pause and the yellow LED on the back will blink while the program is being transferred. Once it is copied across, the program starts running on your micro:bit.
As pointed before, the most obvious common and convenient way of powering the micro:bit would be the on-board JST connector. A simple 2xCarbon Zinc/Alkaline AAA battery box (3V) with JST connector can be used to do this at ease.
Below is the casual snap of my quick and dirty test setup.
The operation of the electronic badge is very simple. The code is tailored to flash two distinct icons in an alternating sequence. There is also a tricky light detection mechanism to disable the flashing icon display when the ambient light level is too intense (substantial daylight, for example).
At this point, keep note that the micro:bit does not have a dedicated light sensor fitted. However, it can use the LEDs of the matrix display to estimate the amount of ambient light.
This light sensing mechanism uses an LED both as an output device, and an input device. When the output pin of the microprocessor drives a voltage across the LED, the LED lights up. If the microcontroller then sets that drive pin as an input, and times how long it takes for the voltage at the top end of the LED to collapse, that time is roughly proportional to the amount of ambient light. This trick should be considered an approximation of the light level and will not be as accurate as using a dedicated light sensor such as a photoresistor.
By using the code editor, you can return a light level value (0-255) that you can use in your own program. To do this, just drag the downloaded hex code into the code editor opened in a new browser window (https://makecode.microbit.org/) and change the default light level value (120) as desired. Be patient, as it may take some time for you to find a practical light level value.
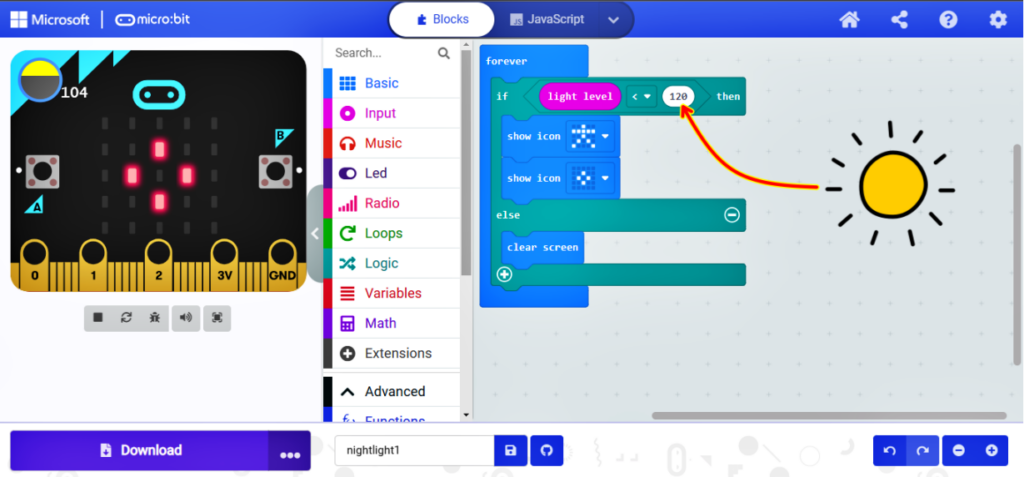
Aside: The Java Script for this project looks like this:
basic.forever(function () {
    if (input.lightLevel() < 120) {
        basic.showIcon(IconNames.StickFigure)
        basic.showIcon(IconNames.SmallDiamond)
    } else {
        basic.clearScreen()
    }
})
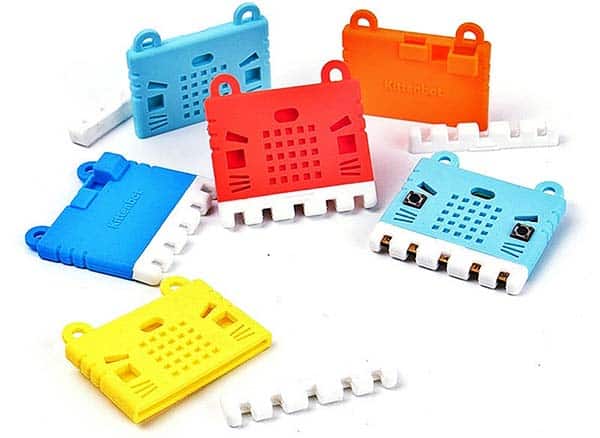
After successful coding and initial tests, you can prepare the final version of the electronic badge. For the enclosure, the best would be to try a suitable transparent acrylic shell or a similar 3D printed one of your choice. Alternatively, a readily available BBC micro:bit silicon protective case like the one shown below can be used. Remember, the battery box should be attached to the badge in a way that is more convenient for the end-users – your kids!
Admittedly, this project is just a child’s play! But look, the BBC micro:bit is an unbelievably mighty microcomputer platform that offers literally endless design possibilities. We will look into that in more detail in upcoming posts. So, till then, Happy Trails!