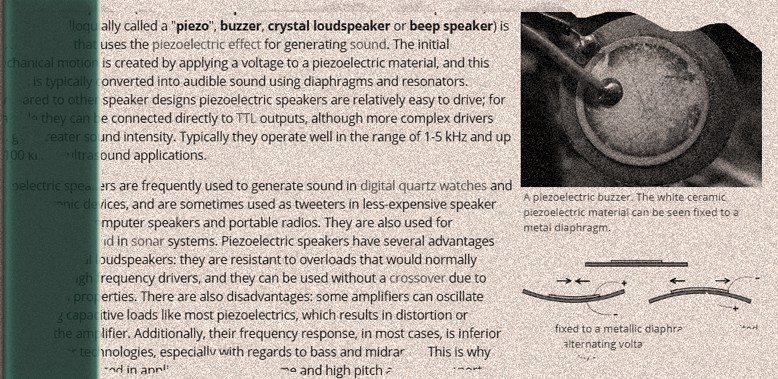
Nowadays, the applications of piezoelectricity in everyday electronic devices are growing at an exciting pace. The term piezo can trace its roots back to ancient Greek, where its significations refer 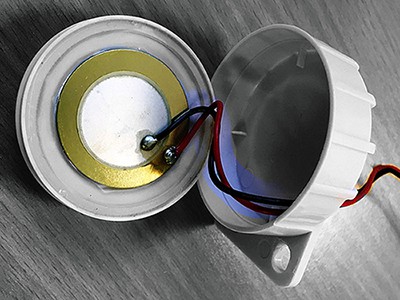 to activities of pressing, pushing, and squeezing. Dating all the way back to 1880, the innovative work of brothers Pierre and Jacques Curie, the piezoelectric effect refers to the ability of particular materials to create an electric charge when subjected to mechanical stress. So just note down that the term piezoelectric effect pertains to electricity produced by mechanical pressure on certain crystals, notably quartz or Rochelle salt. Now we also know that electrostatic stress produces a change in the linear dimensions of the crystal. Here, my humble intention is to provide a few practical hints linked up with the common piezo ceramic discs. First off, thanks to the development of manmade piezo materials – piezoelectric ceramics, in particular!
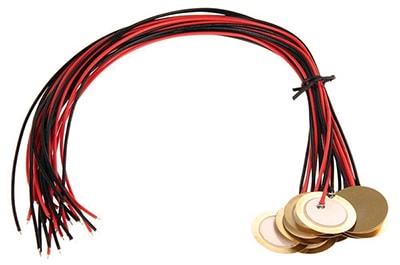
Piezo Ceramic Disc/Piezoelectric Speaker/Passive Piezo Buzzer…
The piezo effect works both ways – if you apply a voltage the piezo stretches, and if it stretches it creates a voltage. So piezo can be used both to play tones and to detect tones.
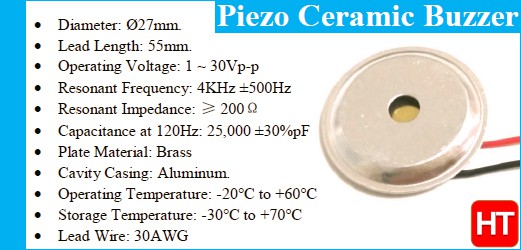
Next is a quick snip off from the official datasheet of a 27mm Ø piezo ceramic disc with a cavity encase. In practice, piezo ceramic disc/element with a cavity encase will produce much higher acoustic output when compared to an ordinary one without the case.
According to Chinese web documentation, the piezoceramic disc is also known as “beep film” which is one of the most used piezoelectric ceramics. It’s the key component of the piezoelectric ‘speaker’ commonly used in musical greeting cards, talking key chains, electronic toys, and gifts. Yes, now I can recall that a long time ago (during my school days), there’s some funny electronic birthday greeting cards and photo albums start playing little melodies through a thin piezoelectric speaker when opened up. I’m sure today you could get them easily from your favorite online retailer.
Piezoceramic discs are featured in virtually every application that needs to efficiently produce sound from a small electronic circuit. Aside from technological and industrial applications, these types of light-weight and low-profile electro-acoustic transducers are now extensively used by electronics hobbyists and makers, even in their microcontroller-based projects. If you’re an ardent Arduino lover, then you can see umpteen musical electronics projects with piezoelectric transducers (PZT) in the Arduino world (in this website as well) because it’s often more practical to employ a thin (and non-magnetic) piezo ceramic disc rather than playing with a bulky (and magnetic) traditional loudspeaker.
Take the trouble to do learn something…
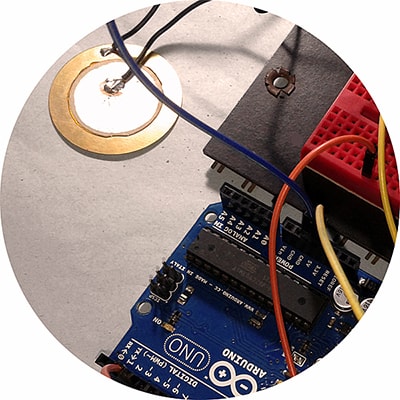
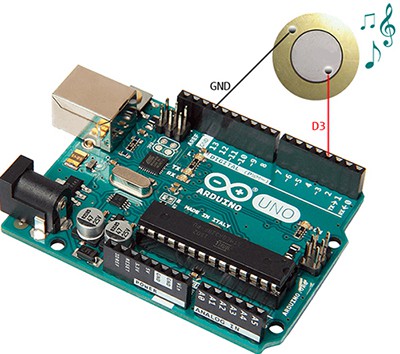
You too can build a little melody generator using nothing more than an Arduino Uno(R3) microcontroller and a common 35mm piezo ceramic disc. Simply connect the piezoceramic disc as shown here, upload the given Arduino Sketch (code), and start out the play.
/*
 * Arduino Uno Chirp Example v1
 * Connect one piezoceramic disc between D3 and GND
 * Download required library from https://github.com/chirp/chirp-arduino
 */
#include <Chirp.h> // Required Library
Chirp chirp;
void setup() {} // Nothing Here!
void loop() {
chirp.chirp("parrotbilllllahcm4"); // Chirp Identifier
delay(2000);
}
If you’ve made it, congrats, but you can’t possibly get an effectual outcome – I guess, what you can hear is only a feeble tone. Frankly, I too tried this project erstwhile with zero luck!
Naturally, I felt depressed at that moment, but I did come across in my searching that while some piezo materials produce more output than others, they’re all relatively low. Yes, for their use to be optimized, an external circuitry will often be needed. Following is a better piezo drive circuit I acquired thereafter from a Chinese datasheet (annotated by me just to save you a lot of time).
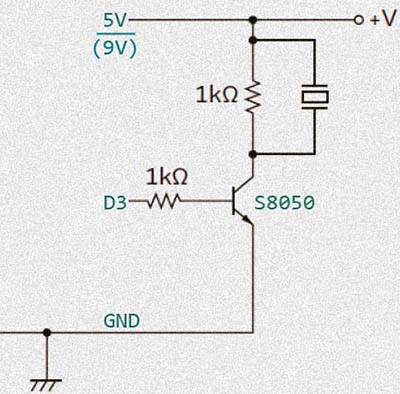
Seemingly you’ll get a rich acoustic output through this modification but I feel concerned about the real outcome. In truth, I got nothing but a bit higher output, even with 9V, that’s not enough to quench my thirst. Still, my very old Chinese magnetic door/window alarm returns its ear-piercing (90-110db) output through a similar piezo ceramic disc! What’s actually taking place behind?
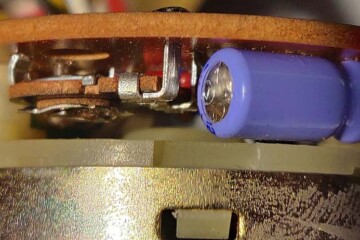
Finally, I dismantled my Chinese alarm and found that there’s a special 3-pin inductor used to drive the piezo ceramic disc (look below). After some Googling I discovered that the 3-pin inductor is usually called “3-pin alarm boost inductor” – actually a small ‘autotransformer’ with a rated total inductance close to 100mH.
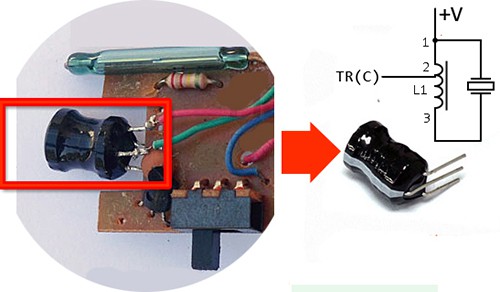
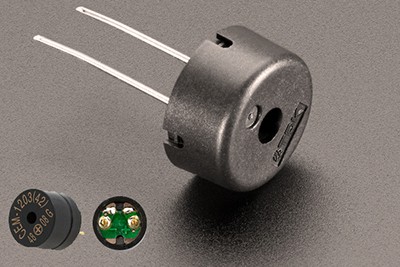
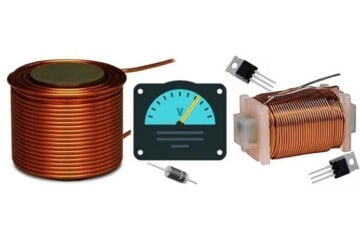
Since the alarm boost inductor is a not a component within my easy reach at the moment, I extended my Googling to find out an alternative way to drive the piezo loudly, and eventually brought another proven trick (it’s a great challenge and pleasure for me to look for the cheapest and easiest parts for my experiments). The enhancement idea is nothing but substituting the resistor (across the piezo) in the previous circuit with an appropriate drum core power inductor.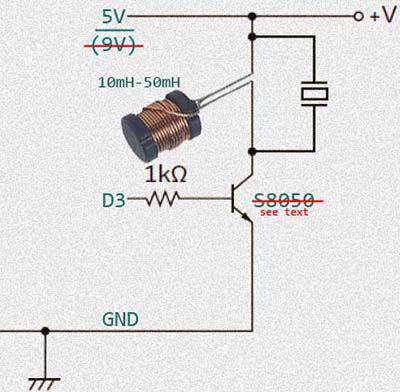
Often the value of the inductor is picked to electrically resonate with the capacitance of the piezoceramic disc at its acoustic resonance (10-50mH seems to give the best results with most piezo ceramic discs). This approach can deliver more acoustic output than the resistor trick, however, the peak-to-peak voltage across the piezoceramic disc may shoots up to many folds – 40 to 80Vp-p is more typical with a 5VDC power supply. So, make sure the driver transistor has a collector-emitter breakdown voltage – Vce(breakdown) – high enough to hold out.
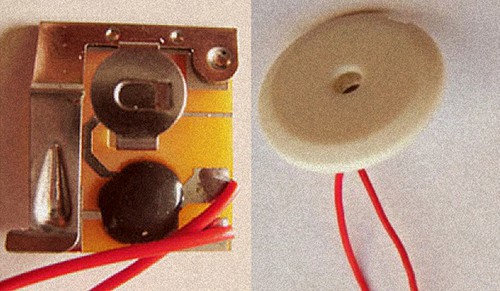
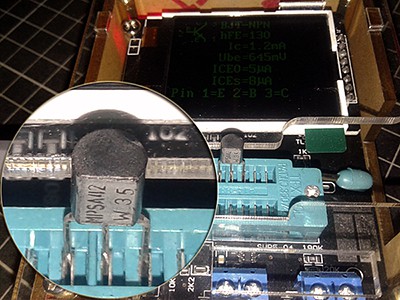
I’m sure that there’s a vast number of suitable BJTs available for this application. Luckily I got a couple of old MPSA42 transistors (see below) to try the new betterment together with a 47mH ‘salvaged’ drum core inductor. Believe me, it’s an ear-splitting experience with the ‘exposed’ 35mm piezo ceramic disc! Now it’s sure that by employing this simple method, we can easily maximize a piezoceramic disc’s output with minimal time and effort. Awesome!
The Cavity Magic Trick!
If you listen to the small piezo speaker/buzzers usually used in desktop alarm clocks, computer motherboards, etc. you will certainly feel much loudly acoustic power from that button-sized passive transducer. What’s its secret? Nothing, they normally feature a resonant cavity that amplifies the sound – yes the housing will be important for optimal output. In short, the piezoceramic disc should be installed in a cavity to produce a high sound pressure level (SPL).
Multi-Layer Piezoelectric Speaker?
A multi-layer piezoelectric speaker has more than one vibrating piezo element. The vibrating elements are designed to have a different resonant frequency, so the combination will guarantee a flatter frequency response over the audible range when compared with the traditional piezo speaker. The effective bandwidth of a multi-layer piezo speaker is usually between 200-500Hz and 20kHz. Because of this, a multi-layer piezo speaker is able to reproduce music and voice much better than the conventional piezo speaker whose frequency response is normally curtailed to a few hundred hertz either side of a resonant frequency in the 3-4kHz realm. Further reading https://docs.rs-online.com/0f60/0900766b8126cdcc.pdf
The Concluding Time
This write up is not entailed to be an exhaustive treatise on piezo ceramic discs. Instead, it shares a couple of ideas by which a common piezo ceramic disc can be driven to high acoustic output in an easy manner. I would certainly prepare a sequel of this article, perhaps packed with more ideas on cavity, tuned pipe, and driver design maths. Finally, I hope you enjoyed this little post (if you’ve followed properly). Drop a comment below for any suggestions, or if you’re stuck with the topic!
Credits & References
- https://learn.sparkfun.com/tutorials/sik-experiment-guide-for-the-arduino-101genuino-101-board/all#experiment-14-using-a-piezo-buzzer
- https://www.edn.com/increase-piezoelectric-transducer-acoustic-output-with-a-simple-circuit/
- https://www.murata.com/en-global/support/faqs/products/sound/sounder/char/sch0001
- https://www.americanpiezo.com/blog/top-uses-of-piezoelectricity-in-everyday-applications/
- https://www.cuidevices.com/blog/buzzer-basics-technologies-tones-and-driving-circuits
- https://blog.mbedded.ninja/electronics/components/piezos/
- https://www.abcomponents.co.uk/buzzer-vs-speaker/
- https://www.wikiwand.com/en/Piezoelectric_speaker
- www.handsontec.com
Hi. nice tutorial and helped me giving many ideas in it. my doubt is, is it possible make a small water vaporizer for kids by using this piezo ceramic disc and the same circuit by using ATtiny uC?
mubasheer ahmed: Thanks a lot for your cheering feedback!
Note that the common piezo ceramic disk does not work well on an ultrasonic atomizer. All you really need is a piezoelectric transducer specially made for ultrasonic atomizer applications. Hopefully, an Attiny uC loaded with the right code can do the rest at ease.
This primer might help you to understand the atomizer tricks better https://www.electroschematics.com/ultrasonic-mist-maker/
If anything isn’t clear, feel free to post your comments here. Be creative ✨
I am thanking you too Mr.Hareendran. very helpful link you have shared me thanks a lot.
Actually, I have a small PCB which was removed from a Toy stove which looks like a gas stove in form factor. Function of the stove is simple there are to switches If switch 1 pressed at burner1 produces very small amount of mist and an LED toggles which makes mist look colored to see and when switch 2 pressed at burner2 one small LED toggles.
When opened and saw inside i found there is a piezo disc was placed on the Burner1 and LED and Only one LED placed at burner2. And PCB whose uC chip might have embedded and filled with black color glue which is difficult to trace and 8 pin IC which looks like 555 but not sure.
Now, My question is instead of timer we can generate all this algorithm within a uC (ATtiny), is this possible? and need to power on this everything within 4.5volts to 5volts, is it possible?
I need any general type of Piezo disc type transducer for this can you please suggest me something which is under very small budget?
Thanking you again Sir.
Mubasheer ahmed: Piezo transducers for audio applications and mist maker applications are quite different in construction and resonant frequency. So, I repeat, just go and gather the right one for the job.
BTW, I’ll try to publish the design details of a budget ultrasonic mist maker here. But I’m afraid that I will need a few more months to do that, if you don’t mind. Thanks!