Here is a simple yet highly reliable thermal control circuit which can be used with almost all electric geysers. The Arduino microcontroller based circuit switches an electromagnetic relay on or off according to the temperature sensed by a single chip temperature sensor LM35DZ. When the sensor detects a temperature lower than the pre-settled threshold level, the relay is energized and when the temperature goes above the threshold, relay is de-energized. The circuit can be powered by any appropriate 12V (>500mA) wall-wart or battery pack.
The 3-pin LM35DZ temperature sensor chip is factory-calibrated in the Celsius (oC) scale with a linear “Degree – to – Volt” conversion function i.e. its output voltage changes linearly with temperature from 0V (0oC) to 1000mV (100oC). This greatly simplifies the circuit design as we only need to upload a small code in order to build a complete thermal controlled switch (thermostat). Besides, No special instrument is needed for calibration.
The relay can be set to trip at any temperature just by changing a single line of code. In practice, most water geysers available in the market have a temperature range of 40 – 75 oC with a default thermostat setting of 60oC (or high). This means that water in the geyser will be heated till it reaches a temperature of 60 oC (or high). Beware, water heated up to this temperature level becomes extremely hot and needs to be mixed with lot of cold water before use.
Hardware Layout & Parts List
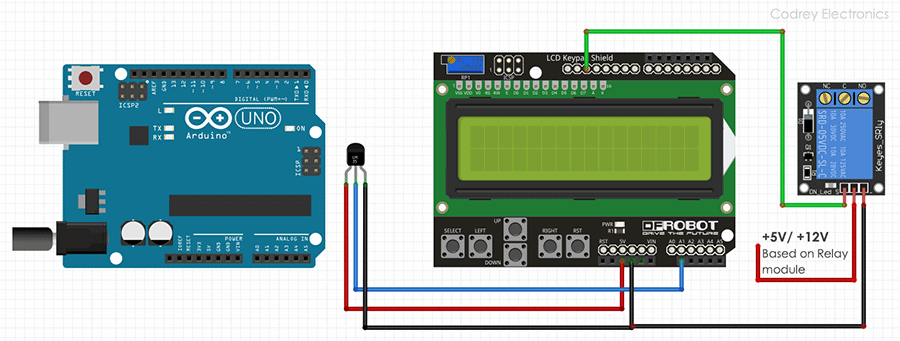
Here, the temperature sensor is wired to A1 of Arduino board but if the sensor cable is longer there’s a chance of noisy analog read. Ideally you should use a low-voltage screened cable for the interconnection. Although adding a small capacitor on the analogue input will dampen the noise, an RC filter (say, a time-constant of 100mS that doesn’t overload the output) instead reduce noise and improve measurements. Also try to decouple the +5V line of LM35 with a 100Ω resistor and 100uF capacitor.
- Arduino Uno Board (Official or Clone)
- 16×2 LCD Keypad Shield (DFRobot DFR0009)
- 12V 1 channel (Hi/Lo) Relay Module
- LM35DZ Temperature Sensor
- 12V DC (>500mA) smps power supply adapter/module
- 100 Ω ¼ W Resistor & 100uF Capacitor (optional – see note)
Arduino Sketch/Code
/*
   *Simple Geyser Thermostat
   *Thermo-Regulator/Arduino Uno
   *LM35 & DFR LCD-Keypad Shield
   *Experimental Sketch v2
   *T.K.Hareendran/08.2018
   *Publisher: Codrey Electronics
   *Site: https://www.Codrey.com
*/

#include <LiquidCrystal.h> // LCD Library
LiquidCrystal lcd(8, 9, 4, 5, 6, 7); // LCD Shield Interface (RS, EN, D4,D5, D6, D7)
int tempPin = A1;   // Temperature Sensor I/P
int tRead; // Temperature Data
int tempMin = 50;   // Minimum temperature level
int tempMax = 60;   // Maximum temperature level/Trip Threshold
int relay = 13;       // Relay Driver O/P
int relayStatus = 1;

void setup() {
  lcd.begin(16, 2);
  pinMode(tempPin, INPUT); // A1 as input
  pinMode(relay, OUTPUT); // D13 as output
  digitalWrite(relay, HIGH); // Turn Relay ON

}

void loop() {
  lcd.setCursor(0, 0);
  lcd.print("THERMO-REGULATOR");
  tRead = readTemp();     // Read temperature


  if (relayStatus == 1 and tRead >= tempMax) {
    // Temperature exceeds TempMax - Turn Relay OFF
    digitalWrite(relay, LOW);
    // Update status
    relayStatus = 0;
  }

  if (relayStatus == 0 and tRead <= tempMin ) {
    // Temperature falls below TemPMin -  Turn Relay ON

    digitalWrite(relay, HIGH);
    // Update status
    relayStatus = 1;

  }

  lcd.setCursor(0, 1);
  lcd.print("WATER TEMP:");
  // Display temperature in *C
  lcd.print(tRead);
  lcd.print((char)223);
  lcd.print("C! ");


  delay(200);
  //lcd.clear();
}

int readTemp() {
 // Get temperature and convert it to Celsius
  tRead = analogRead(tempPin);
  return tRead * 0.48828125; // (5 * 1000 / 1024) / 10
}
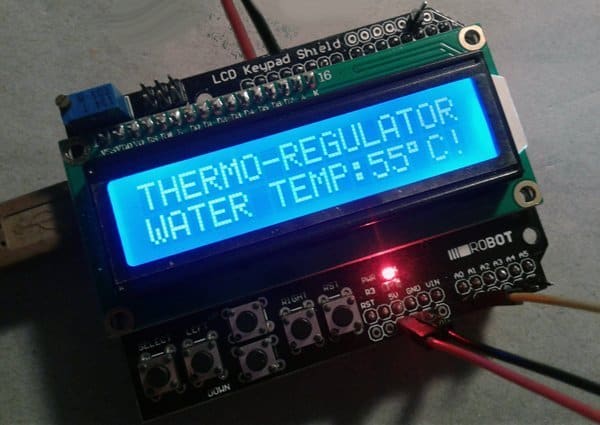
Proof of Concept
& That’s all for now. Thanks for reading! Please feel free to give us your feedback. We strive to keep you well informed…
Hi
I am relatively new to Arduino, this project is awesome, just one question. using the LCD shield can one not adjust the minimum temp and max temp relative to each other using the build in up down buttons. this will save a trip to the device with a laptop (or otherwise)
I have read up a bit on the LCD Shield but struggle o find how that will be acomplished.
Thank you for your projects
John: Using on board buttons of the LCD shield to set desired temperature level is certainly a great idea. Thanks for your suggestion. I’ll come up with such a nifty solution within a couple of weeks. Meanwhile you may refer this project just to get an idea on how to implement more features in your prototype https://electronics-project-hub.com/arduino-water-heater-controller/
Keep me informed and let me know how you get along with it, Good luck!